Controls
QC Results forms are comprised of one or more controls. These controls can have different criteria attached to them, such as whether or not they are required.
Contents
Mandatory Indicator / Filled In
Each of the fields inside QC Results can be marked as being mandatory or non-mandatory. Fields marked as being mandatory will have an indicator that appears to the left of them. A field that is marked as mandatory must be filled in before the screen is considered ‘Complete’. Only a screen that has a status of ‘Complete’ can be put into the ‘Locked’ state (see the next section—Screen States).
- Mandatory controls that have been filled in will have a green indicator.
- Mandatory controls that are not filled in show a red indicator.
What determines if a control is filled in or not depends on the type of control. For instance, a Text Editor is considered filled in if the user has entered text into the control. A Pass-Fail Box is considered filled in if the user has clicked on either pass or fail. There is also an option which causes a Pass-Fail Box to not consider itself filled unless there is a comment entered after choosing a pass/fail value. The Form Link Control doesn’t consider itself filled in until the child forms that live underneath it have a status of ‘Locked’ (see above screenshot). Similarly, the Drill-Down Grid control doesn’t become filled in until it has one or more child rows (this is configurable through CoolScript) are entered and in the ‘Locked’ state.
CoolScript (introduction)
One of the most powerful tools available to the screen designer is the ability to embed scripting code inside the controls/screen events. Inside the screen pictured above, there are several pieces of CoolScript working in the background. For instance inside the Date Editor, there is scripting code wired up to the OnFieldChanged event that causes the Shift Entry grid to reload its contents based on the selected date. Inside the Shift Entry Drill-Down Grid control, there is scripting code to navigate to the next child screen that fires off when the ‘Add Key’ and ‘View Key’ buttons are pressed.
CoolScript can be written to pass down any number of different arguments to the child screen. Most often the script inside the Drill-Down Grid controls involves refreshing the content of the grid when a new row is added, or passing the entered keys down to the next child screen (in this case date and shift number are passed down as arguments).
Screen States
The child screens inside QC Results each correspond to a row inside the backing database table. Every row in the backing database table has a common set of fields called the Row Metadata. The time the row was created and who created it, the last time the row was modified and the user who modified it, and the status of the row are all part of the Row Metadata. The list of screen states (also known as row status) is as follows:
1. “New” – The row has been created inside the database but has no data beyond the basic Row Metadata filled out.
2. “Partial” – The row has been created and some of the fields have been filled out but not all mandatory controls have been filled in.
3. “Complete” – All the mandatory fields for the record have been filled in, but the user has not signed off and locked the form by clicking the ‘Done’ button.
4. “Locked” – The user has filled in all mandatory fields and signed off on the form by clicking the ‘Done’ button. Once a form has been signed off on, it becomes read-only and can be viewed but not modified from that point on.
Attach Image Metadata
- Indicates the field supports image attachments, but no images have been uploaded.
- One or more images have been uploaded and are attached to the field.
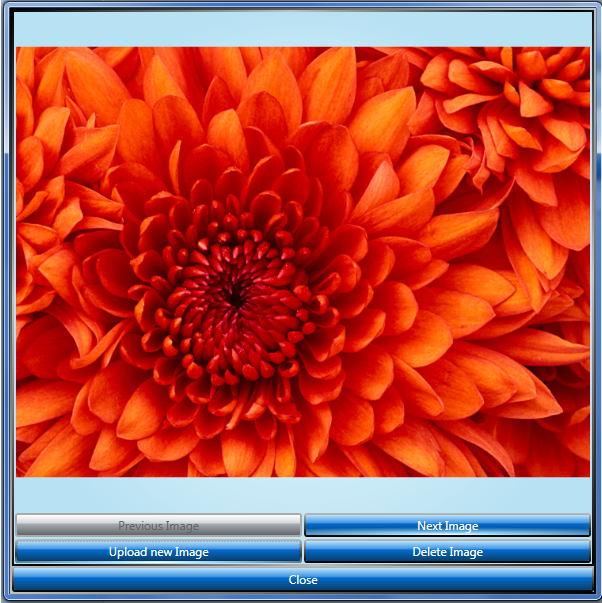
One of the most powerful features in QC Results is the ability to attach images to a field and store them inside a table as part of the Field Metadata. Images are collected on the shop floor using the handheld’s built in camera and sent wirelessly to the server where they are persisted into the database. Alternatively, images (possibly taken with a digital camera) can be uploaded from the desktop environment by simply selecting a file located on the user’s hard drive by using the image metadata editor control. Controls that support image metadata appear with an image metadata indicator beside them (pictured above). Clicking on the image metadata indicator button will launch an image metadata editor control (pictured below).
With the image metadata editor control, users can add, delete and navigate through images attached to a given field on a form.
Constraints
Another powerful feature of the QC Results system is the ability to set up constraints on a field. A constraint defined as a value or range of values which the data entered must fall inside. There are four types of constraints that can be defined for numeric fields:
1. Hard Maximum – This is maximum tolerable value that the field can have. Anything greater than the hard maximum will cause the field to turn red, alerting the user that the reading entered is out of spec and required corrective action.
2. Soft Maximum – Any readings greater than the soft maximum cause the field to turn yellow, indicating that the value has exceeded a soft threshold but is still less than the hard maximum.
3. Soft Minimum – Works the same as soft maximum but in the reverse direction. If the value entered is less than the soft minimum the field will turn yellow.
4. Hard Minimum – Same as hard maximum except reversed
For each of the four types of constraint failures, a CoolScript event is triggered. The screen designer may choose to embed scripting code which launches a corrective action. Examples of corrective action might be firing an e-mail off to supervisors, requiring the user to fill in additional fields describing what they did to address the problem, or launching a full blown corrective action report form.
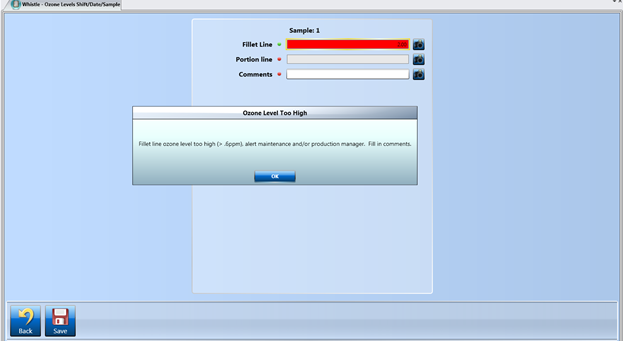
In the screenshot above, the user has entered a value of 2.0 which has exceeded the hard maximum constraint. The embedded CoolScript code displays a message box and sets the comments field as a mandatory field.
Linked Remediation Forms
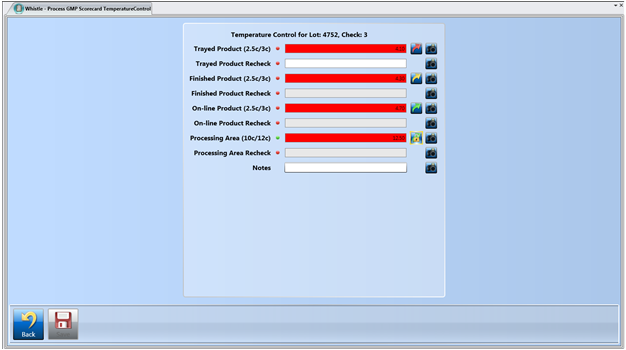
When a constraint has failed, the scripting code can launch a linked remediation form. Pictured above is a screen with four constraint failures. The status of the linked remediation form is indicated by the arrow icon:
- A red arrow means the linked remediation form is in the ‘Created’ state.
- A yellow arrow means the linked remediation form is in the ‘Partial’ state.
- A green arrow indicates that the linked remediation form is in the ‘Created’ state but hasn’t been locked.
- A green arrow with a padlock on it indicates the linked remediation form has been filled out and locked.
Notice that the only field that has a constraint failure which has its mandatory indicator set to green (filled in) is the one with the ‘Locked’ remediation form. If a field has a linked remediation form attached to it, that remediation form must also be completed and locked for the parent field be considered filled in.
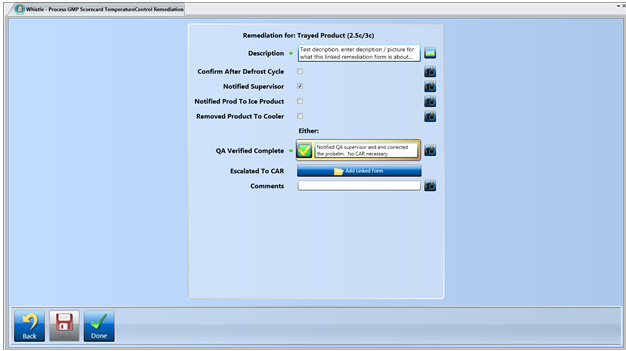
Below is an example of the linked remediation form for the Temperature Control screen pictured above:
Using CoolScript to Constrain User Input
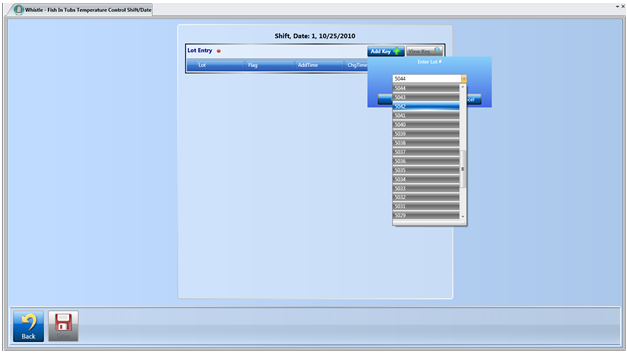
The CoolScript scripting language is used just about everywhere when building screens in QC Results. Pictured above is a screen – Fish In Tubs Temperature Control that only allows the user to select from an ordered list of valid lots. The CoolScript behind the OnAddNewKeyItem event handler does a SQL query against the WMS system’s lot table. Here is another example of using CoolScript to validate user input:
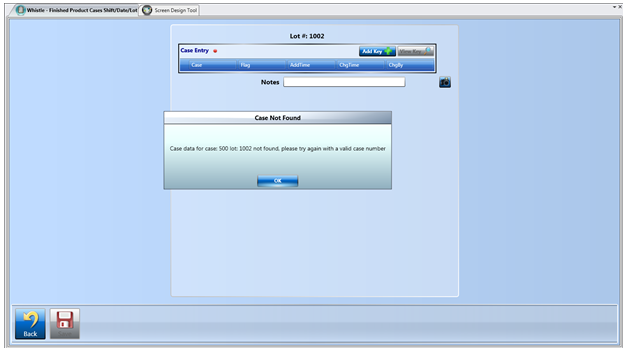
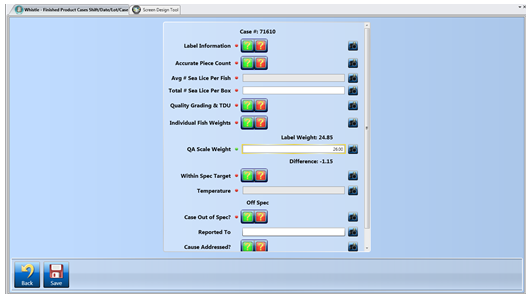
In this above example, the user tried to enter in case number 500 into the add new key dialog for the Case Entry Drill-Down Grid. The CoolScript behind the OnAddNewKeyItem event handler for this control executes a SQL query that checks the WMS system’s case table to determine if the entered case number really does belong to lot 1002. If it does, the case weight is passed down to the next screen and the child screen is launched (see below):
In this example, the case weight is passed down and the CoolScript behind the OnFieldChanged event on the QA Scale Weight field automatically calculates/displays the difference between the weight that appears on the label and the reading from the QA inspector’s scale.
Link to Control Types
Return to QC Results


