Difference between revisions of "GS:Ship Window"
| (20 intermediate revisions by the same user not shown) | |||
| Line 3: | Line 3: | ||
==Shipping== | ==Shipping== | ||
| − | [[Image:Shipping1.gif|Image:Shipping1.gif]] | + | [[Image:Shipping1.gif|500px|Image:Shipping1.gif|500px]] |
Select ‘Shipping’ from the main menu to access the Shipping menu. This screen will also have a window-tab feature like Report Production and is accessed in the same way. | Select ‘Shipping’ from the main menu to access the Shipping menu. This screen will also have a window-tab feature like Report Production and is accessed in the same way. | ||
If you are shipping a Sales Order and you know the order number, just enter it. If you are shipping a Warehouse Transfer, or you are shipping a Sales Order but don't know the number, press the "Ctrl-A" keys. You will see a small options menu. | If you are shipping a Sales Order and you know the order number, just enter it. If you are shipping a Warehouse Transfer, or you are shipping a Sales Order but don't know the number, press the "Ctrl-A" keys. You will see a small options menu. | ||
| − | |||
| − | + | [[Image:ShipOrdMenu.gif|500px|Image:ShipOrdMenu.gif|500px]] | |
| − | + | Select whether you are shipping a Sales Order or a Warehouse Transfer, by highlighting your selection, and pressing "Enter". Whistle will immediately look for all of the open SOs or WTs that need to be filled. | |
| + | [[Image:ShpWnd1.gif|500px|Image:ShpWnd1.gif|500px]] | ||
| − | |||
| − | Whistle will return to the main shipping screen with the correct | + | Use the arrow and/or tab keys to highlight the order that you want to fill. Press "Enter". |
| + | |||
| + | Whistle will return to the main shipping screen with the correct order number. | ||
| + | |||
| + | ;Note: Remember, if you just enter in an order number, Whistle will automatically assume you are shipping a Sales Order. If you want to ship a Warehouse Transfer, you must press "Ctrl-A", and select it in the menu. | ||
| + | |||
==Picklist== | ==Picklist== | ||
| Line 23: | Line 27: | ||
;NOTE | ;NOTE | ||
:Whistle must generate a PICKLIST for all Shipping Orders that you want to fill. A PICKLIST is a list of specific containers that are allocated to filling the particular sales order. Once you generate a PICKLIST, all conainers on the PICKLIST will be reserved for use by that sales order alone. The containers will not be able to be used for anything else. | :Whistle must generate a PICKLIST for all Shipping Orders that you want to fill. A PICKLIST is a list of specific containers that are allocated to filling the particular sales order. Once you generate a PICKLIST, all conainers on the PICKLIST will be reserved for use by that sales order alone. The containers will not be able to be used for anything else. | ||
| − | |||
| − | + | If a PICKLIST has not been generated for this order, Whistle will ask you if you would like to generate one at this time. Select "<YES>" to generate a PICKLIST. Be patient, for this may take a little time. | |
| + | [[Image:ShpWnd2.gif|500px|Image:ShpWnd2.gif|500px]] | ||
| − | |||
| − | + | The cursor will automatically move to the "<Pick Options>" option. | |
| − | + | [[Image:ShpWnd3.gif|500px|Image:ShpWnd3.gif|500px]] | |
| − | You have | + | Press "Enter" to view a list of Pick Options. |
| + | |||
| + | You have 5 options... | ||
===Next Pallet=== | ===Next Pallet=== | ||
| − | [Image: | + | [[Image:ShipPickMenu.gif|500px|Image:ShipPickMenu.gif|500px]] |
| + | |||
| + | Whistle is set up to automatically tell you which container to pick next. Whistle will automatically take you to the [[GS:Picking Window|Picking Window]]. See that part of the user guide for more information. | ||
| + | |||
| + | [[Image:ShpWnd4.gif|500px|Image:ShpWnd4.gif|500px]] | ||
| + | |||
| + | |||
| + | ;Note: the selected container must next be loaded for shipping. | ||
| − | |||
===Choose From List=== | ===Choose From List=== | ||
This option allows you to choose a particular container from the PICKLIST. The following PICKLIST screen will be displayed... | This option allows you to choose a particular container from the PICKLIST. The following PICKLIST screen will be displayed... | ||
| − | [[Image: | + | [[Image:ShpWnd5.gif|500px|Image:ShpWnd5.gif|500px]] |
| − | |||
| + | Select the desired Container to load it into the [[GS:Picking Window|Picking Window]]. Again, see that part of the user guide for more information. | ||
| − | [[Image: | + | [[Image:ShpWnd6.gif|500px|Image:ShpWnd6.gif|500px]] |
| + | ===Print List=== | ||
| + | If this is selected, then the picklist is sent to the default printer. | ||
===Regenerate=== | ===Regenerate=== | ||
| Line 59: | Line 72: | ||
Use this option to release from hold all of the containers that are on the PICKLIST. This will destroy the PICKLIST. You will have to create another PICKLIST if you want to pick items for this sales order. | Use this option to release from hold all of the containers that are on the PICKLIST. This will destroy the PICKLIST. You will have to create another PICKLIST if you want to pick items for this sales order. | ||
| − | + | When you select "Deallocate List", the following message will be displayed. | |
| − | + | [[Image:ShpWnd7.gif|500px|Image:ShpWnd7.gif|500px]] | |
| − | + | "No" is defaulted. Select "<Yes>" to continue. The PICKLIST will be destroyed. When you look at the "<Pick Options>" again, you will only see one option, for generating the PICKLIST. | |
| − | |||
| − | + | ==Option Buttons== | |
| − | + | There are several buttons at the bottom of the screen for performing different tasks. | |
| − | + | ||
| − | + | ||
| − | == | + | |
| − | + | ||
| − | + | ||
| − | + | ||
| − | + | ||
| − | + | ||
| − | + | ||
| − | + | ||
| − | + | ||
| − | + | ||
===LOAD=== | ===LOAD=== | ||
| − | Select <LOAD> to load the container as it is. If the container’s quantity exceeds the quantity required for the load, you will be asked | + | Select "<LOAD>" to load the container as it is. If the container’s quantity exceeds the quantity required for the load, you will be asked if you would like to split the pallet. |
[[Image:Shipping16.gif|Image:Shipping16.gif]] | [[Image:Shipping16.gif|Image:Shipping16.gif]] | ||
| − | Select < | + | Select "<OK>" if you would like to split the container. You will then proceed to the SPLIT PALLET screen. If the quantity does not exceed the required amount, the Load will be performed, and a message will be displayed upon completion. |
| − | + | ||
| − | + | ||
| − | + | ||
| − | + | ||
| − | + | ||
| − | + | ||
| − | + | ||
| − | + | ||
| − | + | ||
| − | + | ||
| − | + | ||
| − | + | ||
| − | + | ||
| − | + | ||
| − | + | ||
[[Image:Shipping9.gif|Image:Shipping9.gif]] | [[Image:Shipping9.gif|Image:Shipping9.gif]] | ||
| − | Select <OK> to continue. | + | Select "<OK>" to continue. |
| − | Whistle will default back to ‘Picking’ mode after a container is loaded into the system. It will automatically select the next container to pick. Repeat this Picking / Loading process until all items on the shipping order are loaded. Once all items associated with a Sales Order are loaded, a Supervisor will review and ship them. The shipping process may be repeated until all of the day’s | + | Whistle will default back to ‘Picking’ mode after a container is loaded into the system. It will automatically select the next container to pick. Repeat this Picking / Loading process until all items on the shipping order are loaded. Once all items associated with a Sales Order or Warehouse Transfer are loaded, a Supervisor will review and ship them. The shipping process may be repeated until all of the day’s orders are filled. |
| − | |||
| − | |||
| − | + | ===SPLIT=== | |
| + | Select "<SPLIT>" to split a pallet into two different pallets. See the [[GS:Pallet to Pallet Transfer|Pallet to Pallet Transfer]] section of this guide for details on how to split a pallet. | ||
| + | You will be given the opportunity to load the original container in the Shipping Screen. Notice that the quantity that you will be loading has been decreased by the amount of item that you have transferred off of the container in the Split transaction. | ||
| − | |||
| − | |||
| − | |||
| − | |||
| − | |||
| − | |||
| − | |||
| − | |||
| − | |||
| − | |||
| − | |||
| − | |||
| − | |||
| − | |||
| − | |||
| − | |||
| − | |||
| − | |||
| − | |||
| − | |||
| − | |||
| − | |||
| − | |||
| − | |||
| − | |||
| − | |||
| − | |||
| − | |||
| − | |||
| − | |||
| − | |||
| − | |||
| − | |||
| − | |||
| − | |||
| + | ===Adjust Quantity=== | ||
| + | Select "<ADJ QTY>" to adjust the quantity located on the container. Only use this function if the quantity on the container differs from the quantity Whistle *thinks* is on the container. Whistle will take you to the [[GS:Adjust Inventory|Adjust Inventory]] screen. See that section of the user guide for details. | ||
[[Image:Shipping24.gif|Image:Shipping24.gif]] | [[Image:Shipping24.gif|Image:Shipping24.gif]] | ||
| − | + | After finishing adjusting the inventory, you will be brought back to the main Shipping Screen to have the opportunity to load the container for shipping. | |
| − | + | ===VIEW LOAD=== | |
| − | + | Select "<VIEW LOAD>" to view what has already been loaded for this order. | |
| − | + | ||
| − | + | ||
| − | + | ||
| − | + | ||
| − | + | ||
| − | == | + | |
| − | + | ||
| − | Select <VIEW LOAD> to | + | |
[[Image:Shipping10.gif|Image:Shipping10.gif]] | [[Image:Shipping10.gif|Image:Shipping10.gif]] | ||
| Line 178: | Line 122: | ||
Press any key to return back to the Shipping Screen. | Press any key to return back to the Shipping Screen. | ||
| − | == | + | ===UNLOAD=== |
| − | + | Select "<UNLOAD>" to unload a particular container that has already been loaded. | |
| − | Select <UNLOAD> to | + | |
| − | + | ||
[[Image:Shipping12.gif|Image:Shipping12.gif]] | [[Image:Shipping12.gif|Image:Shipping12.gif]] | ||
| − | + | Enter the '''Track #''' or the '''Item #''' of the container that you wish to unload. | |
| − | Enter the Track # or the Item # of the container that you wish to unload. | + | |
| Line 192: | Line 133: | ||
| − | Select <UNLOAD> to process the unload transaction and return to the shipping screen. | + | Select "<UNLOAD>" to process the unload transaction and return to the shipping screen. |
| − | + | ||
==[[GS:Ship Window Settings|Ship Window Settings]]== | ==[[GS:Ship Window Settings|Ship Window Settings]]== | ||
Latest revision as of 17:50, 27 June 2006
The Shipping function allows the user to pick and fill sales orders that need to be shipped. Shipping and picking personnel will most often use this screen.
Contents
Shipping
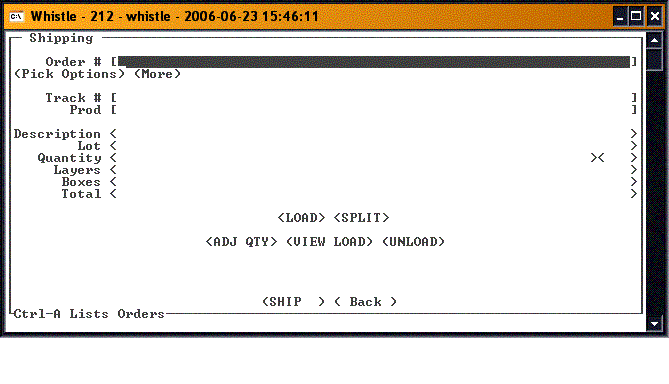
Select ‘Shipping’ from the main menu to access the Shipping menu. This screen will also have a window-tab feature like Report Production and is accessed in the same way.
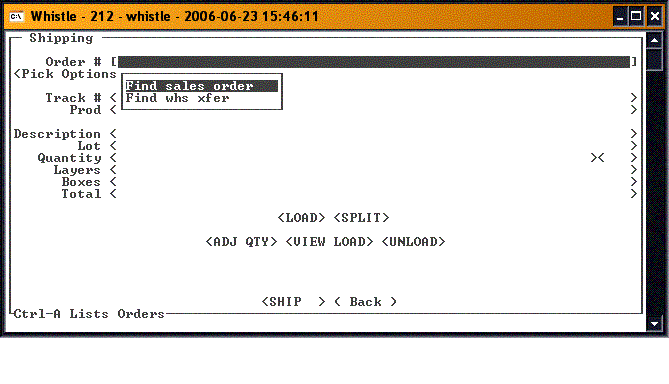
If you are shipping a Sales Order and you know the order number, just enter it. If you are shipping a Warehouse Transfer, or you are shipping a Sales Order but don't know the number, press the "Ctrl-A" keys. You will see a small options menu.
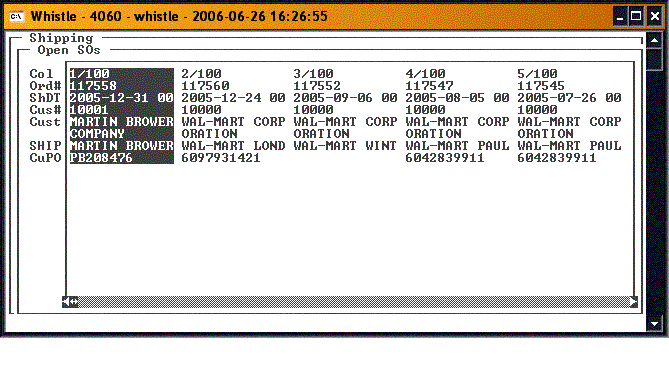
Select whether you are shipping a Sales Order or a Warehouse Transfer, by highlighting your selection, and pressing "Enter". Whistle will immediately look for all of the open SOs or WTs that need to be filled.
Use the arrow and/or tab keys to highlight the order that you want to fill. Press "Enter".
Whistle will return to the main shipping screen with the correct order number.
- Note
- Remember, if you just enter in an order number, Whistle will automatically assume you are shipping a Sales Order. If you want to ship a Warehouse Transfer, you must press "Ctrl-A", and select it in the menu.
Picklist
- NOTE
- Whistle must generate a PICKLIST for all Shipping Orders that you want to fill. A PICKLIST is a list of specific containers that are allocated to filling the particular sales order. Once you generate a PICKLIST, all conainers on the PICKLIST will be reserved for use by that sales order alone. The containers will not be able to be used for anything else.
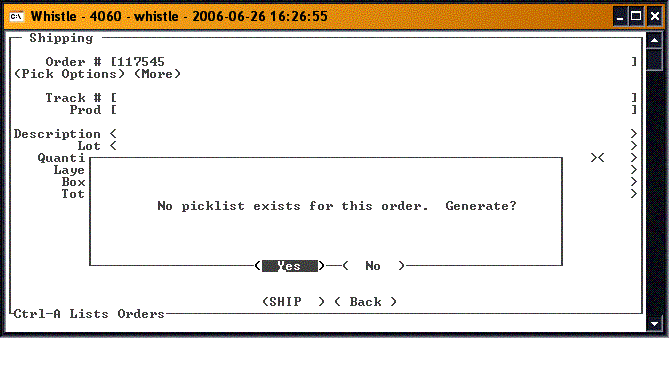
If a PICKLIST has not been generated for this order, Whistle will ask you if you would like to generate one at this time. Select "<YES>" to generate a PICKLIST. Be patient, for this may take a little time.
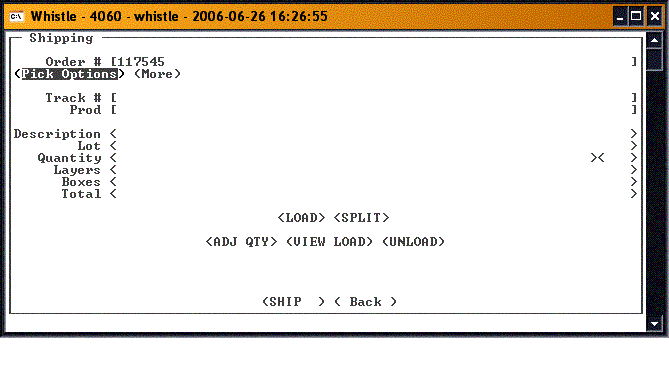
The cursor will automatically move to the "<Pick Options>" option.
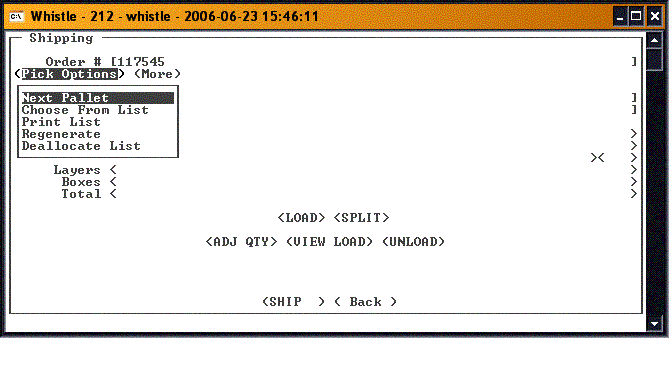
Press "Enter" to view a list of Pick Options.
You have 5 options...
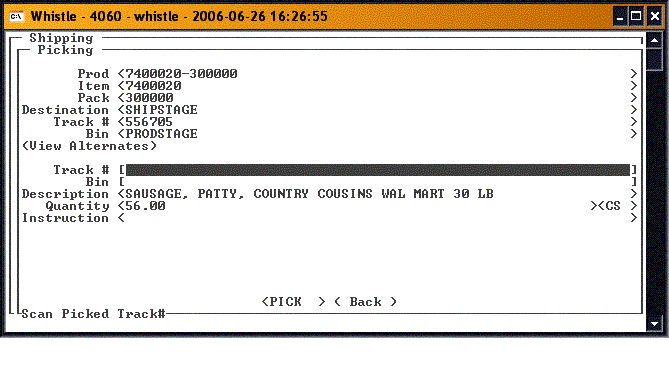
Next Pallet
Whistle is set up to automatically tell you which container to pick next. Whistle will automatically take you to the Picking Window. See that part of the user guide for more information.
- Note
- the selected container must next be loaded for shipping.
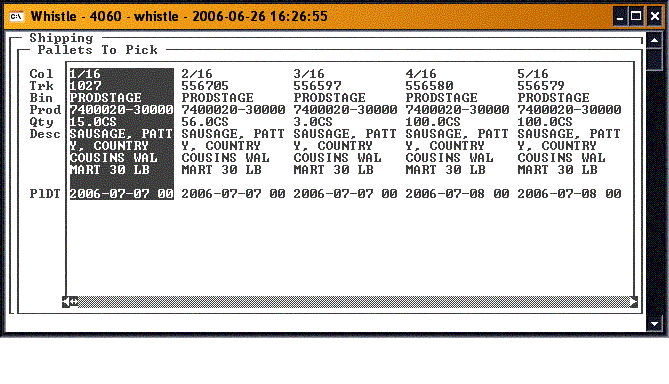
Choose From List
This option allows you to choose a particular container from the PICKLIST. The following PICKLIST screen will be displayed...
Select the desired Container to load it into the Picking Window. Again, see that part of the user guide for more information.
Print List
If this is selected, then the picklist is sent to the default printer.
Regenerate
This option will regenerate another PICKLIST.
Deallocate List
Use this option to release from hold all of the containers that are on the PICKLIST. This will destroy the PICKLIST. You will have to create another PICKLIST if you want to pick items for this sales order.
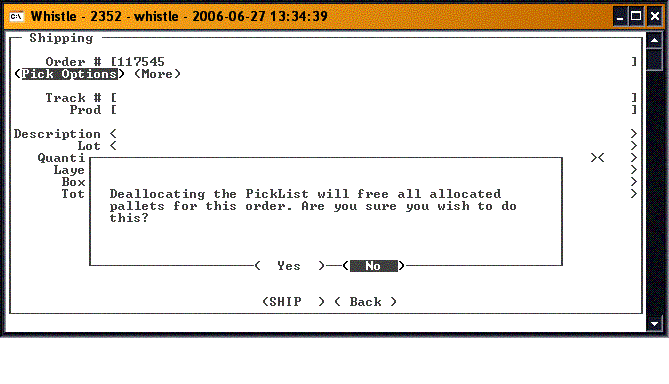
When you select "Deallocate List", the following message will be displayed.
"No" is defaulted. Select "<Yes>" to continue. The PICKLIST will be destroyed. When you look at the "<Pick Options>" again, you will only see one option, for generating the PICKLIST.
Option Buttons
There are several buttons at the bottom of the screen for performing different tasks.
LOAD
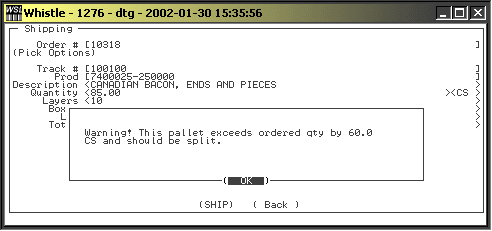
Select "<LOAD>" to load the container as it is. If the container’s quantity exceeds the quantity required for the load, you will be asked if you would like to split the pallet.
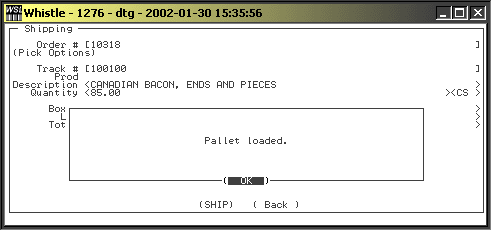
Select "<OK>" if you would like to split the container. You will then proceed to the SPLIT PALLET screen. If the quantity does not exceed the required amount, the Load will be performed, and a message will be displayed upon completion.
Select "<OK>" to continue.
Whistle will default back to ‘Picking’ mode after a container is loaded into the system. It will automatically select the next container to pick. Repeat this Picking / Loading process until all items on the shipping order are loaded. Once all items associated with a Sales Order or Warehouse Transfer are loaded, a Supervisor will review and ship them. The shipping process may be repeated until all of the day’s orders are filled.
SPLIT
Select "<SPLIT>" to split a pallet into two different pallets. See the Pallet to Pallet Transfer section of this guide for details on how to split a pallet.
You will be given the opportunity to load the original container in the Shipping Screen. Notice that the quantity that you will be loading has been decreased by the amount of item that you have transferred off of the container in the Split transaction.
Adjust Quantity
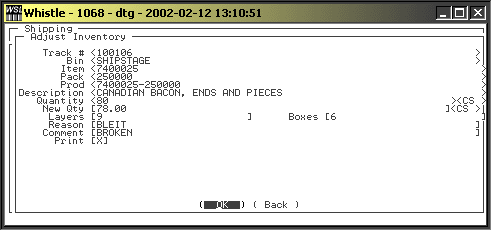
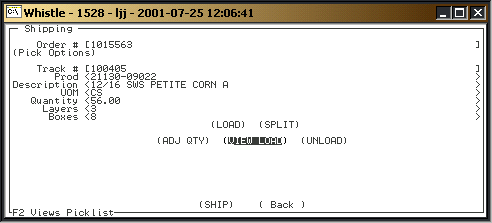
Select "<ADJ QTY>" to adjust the quantity located on the container. Only use this function if the quantity on the container differs from the quantity Whistle *thinks* is on the container. Whistle will take you to the Adjust Inventory screen. See that section of the user guide for details.
After finishing adjusting the inventory, you will be brought back to the main Shipping Screen to have the opportunity to load the container for shipping.
VIEW LOAD
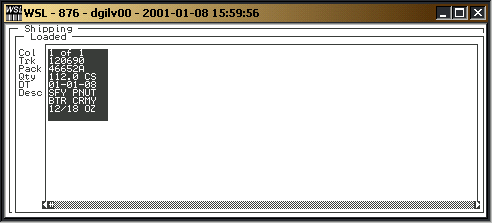
Select "<VIEW LOAD>" to view what has already been loaded for this order.
Whistle will display a list of all items associated with the sales order that have been loaded.
Press any key to return back to the Shipping Screen.
UNLOAD
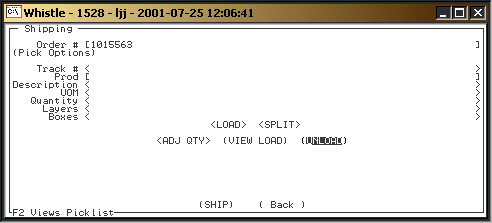
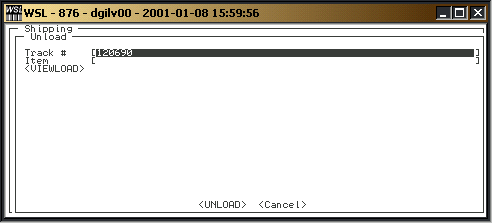
Select "<UNLOAD>" to unload a particular container that has already been loaded.
Enter the Track # or the Item # of the container that you wish to unload.
Select "<UNLOAD>" to process the unload transaction and return to the shipping screen.
