Difference between revisions of "GS:Reclassify Items"
(→How to Reclassify an Item) |
|||
| Line 26: | Line 26: | ||
A description field will display the new item/pack’s description once validation is complete. | A description field will display the new item/pack’s description once validation is complete. | ||
| − | As mentioned above, if the window setting "Allow different container types" has been turned on, then '''Quantity''' and '''Lot''' fields will be available for those values to be altered. | + | As mentioned above, if the window setting "Allow different container types" has been turned on, then '''Quantity''' and '''Lot''' fields will be available for those values to be altered. When you are in the '''Quantity''' field, pressing Ctrl-S will bring up the [[GS:Scale Window|Scale Window]], where you can enter in the weight information. |
A "<More>" button is available to update any catchweighting properties that need alteration. | A "<More>" button is available to update any catchweighting properties that need alteration. | ||
Latest revision as of 11:09, 18 October 2006
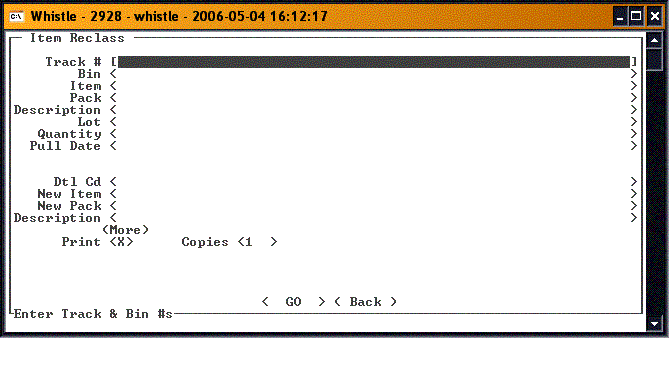
Reclassify Items, or Item Reclass(ification) as it is sometimes known, is a screen whose function is to allow changing of an item’s information, such as the item number, the pack number, or, if the window setting "Allow different container types" has been turned on, the quantity or lot associated with this item. Should the user wish to alter existing inventory from the current classification (Item and/or Pack), they would use this screen to give that inventory a new classification.
How to Reclassify an Item
A Tracking # is selected by the user via scanner or keyboard, or selecting from the Find Inventory screen, by using the "Ctrl" and "A" keys.
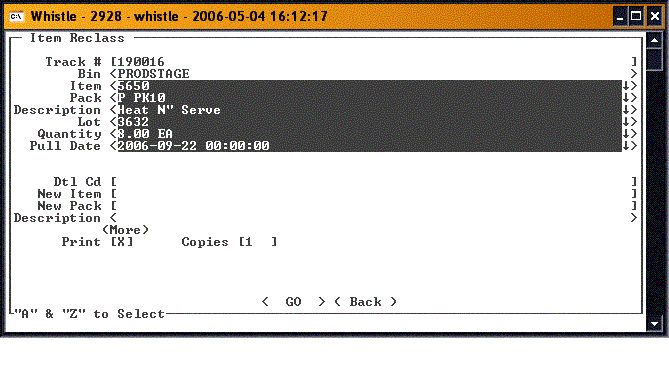
Once the pallet information is displayed, the user can select which item on the pallet they wish to reclassify by using the "A" and "Z" keys to toggle between items, until the desired item shows on the screen.
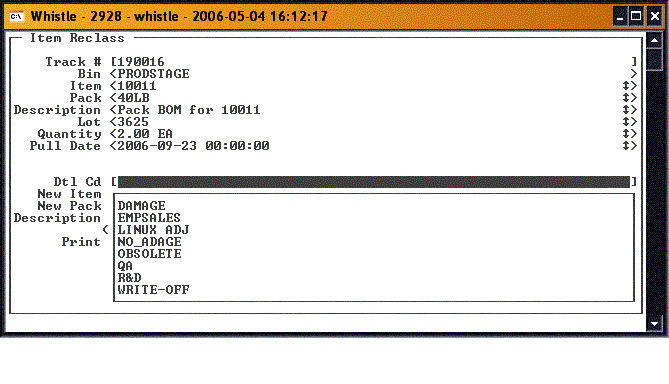
After selecting the item, the user can tab down to the Dtl Cd (Detail Code) field. Whistle will display available selections that can be used to input a code corresponding with the reason for the reclassification.
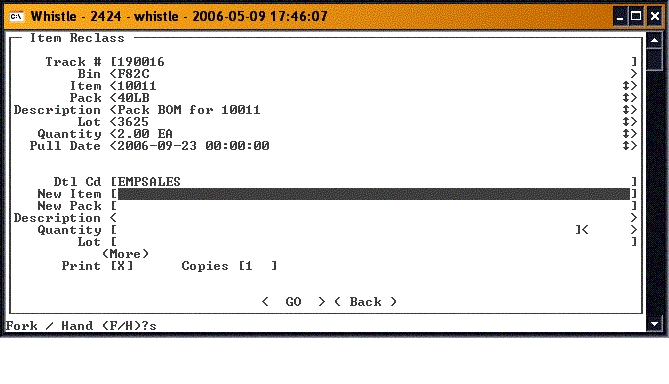
The user can then tab down to the New Item field. This field will accept entry of the item’s new, and previously ERP defined, code.
The New Pack field will accept entry of the item’s new, and also previously ERP defined, pack code.
Validation is performed on the new Item/Pack codes for their existence in your ERP.
A description field will display the new item/pack’s description once validation is complete.
As mentioned above, if the window setting "Allow different container types" has been turned on, then Quantity and Lot fields will be available for those values to be altered. When you are in the Quantity field, pressing Ctrl-S will bring up the Scale Window, where you can enter in the weight information.
A "<More>" button is available to update any catchweighting properties that need alteration.
A “Print” checkbox and “Copies” field are available so the user may specify whether new print tags are required and how many copies are preferred.
Selecting the "<GO>" button and hitting "ENTER" will commit the transaction and reclassify the item under the newly selected item/pack codes.
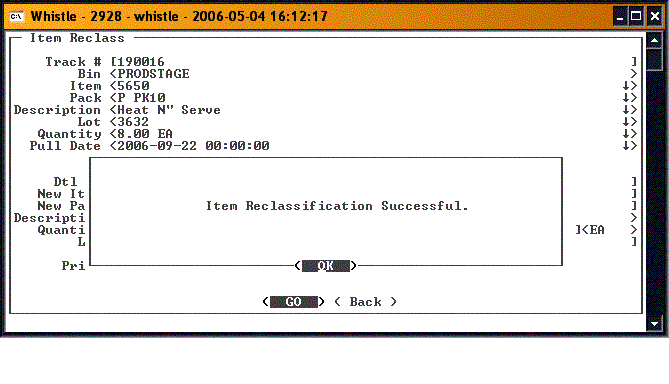
A message will appear if the item has been successfully reclassified. Press "Enter" to continue.
