Difference between revisions of "36:Adjust Inventory"
(→To perform adjust quantity transactions) |
(→To perform adjust inventory transactions) |
||
| (29 intermediate revisions by 2 users not shown) | |||
| Line 1: | Line 1: | ||
| − | The first option | + | ==Adjust Inventory== |
| + | The first option on the Inventory menu is the Adjust Inventory function. It is used to update quantity data associated with a particular pallet. Altering this information can necessitate the need for a new pallet print tag. This screen gives the option to print a new tag upon making the change. | ||
| − | ;NOTE | + | ;NOTE: ‘Adjust Inventory’ is only used to enter miscellaneous adjustments to your ERP system. If the quantity is incorrect because of an error when reporting production, correct the error in the Production Reporting screen (see Production Menu). |
| − | ==To perform adjust | + | ===To perform adjust inventory transactions=== |
| − | Select | + | Select '''Adj Qty''' from the Inventory Menu. |
| − | Scan or enter the container tracking number. You may also use | + | Scan or enter the container tracking number. You may also use Ctrl-A to begin an inventory-query based on the [[36:Find Inventory|Find Inventory]] to find a particular pallet. |
| − | |||
| − | + | [[Image:AdjustQuantity1.gif|500px|Image:AdjustQuantity1.gif|500px]] | |
| − | + | ||
| − | + | ||
| − | [[Image: | + | |
| − | + | The system displays the bin, item/pack number, description, lot and quantity associated with the tracking number. The quantity is displayed in the standard units of measure (uom) for the item. More than one item may be associated with the tracking number. Press the ‘A’ and ‘Z’ keys to view the other items associated with the tracking number. These keys can also be used to toggle between different UOMs. Note that you can only do this if the item in question can be represented in terms of several UOMs. | |
| − | + | Enter the new quantity (in standard uom’s) in the new quantity field. | |
| + | |||
| + | Note: While you are in the '''New Quantity''' field, you can press Ctrl-S, and go to the [[36:Scale Window|Scale Window]] to enter the weight information, if desired. | ||
| + | |||
| + | |||
| + | [[Image:AdjustQuantity2.gif|500px|Image:AdjustQuantity2.gif|500px]] | ||
| + | |||
| + | Quantities may also be entered in terms of the number of cases in a container. Make sure that the UOM field displays “CS”. This lets the program know that you are entering quantities in units of Cases. This allows the user to use the “Layers” and “Boxes” fields to enter the quantity as well. | ||
Enter the number of layers and the number of boxes per layer in a container. A new quantity is automatically calculated from the Layers and Boxes data. | Enter the number of layers and the number of boxes per layer in a container. A new quantity is automatically calculated from the Layers and Boxes data. | ||
| − | All | + | All '''Adjust Inventory''' transactions require the user to state the reason for their transaction. A list of valid reason codes is provided to aid you in selecting the proper reason. |
| − | Enter the reason in the | + | Enter the reason in the '''Reason''' field. Select a reason by pressing using the arrow key and pressing enter. |
| − | You may enter a comment in the Comment field to accompany this container. | + | You may enter a comment in the '''Comment''' field to accompany this container. |
| − | There may be a Print | + | There may be a '''Print''' checkbox and '''Copies''' checkbox present. Checking the Print box instructs Whistle that the user wants to print a pallet tag for this updated container. The Copies box instructs Whistle on how many tags to print out. |
Highlight “<OK>” and press “Enter”. | Highlight “<OK>” and press “Enter”. | ||
Whistle will ask if you would like to proceed with this transaction. | Whistle will ask if you would like to proceed with this transaction. | ||
| + | [[Image:AdjustQuantity4.gif|500px|Image:AdjustQuantity4.gif|500px]] | ||
| − | + | Select “<YES>” to complete the transaction. | |
| − | + | ||
| − | + | ||
| − | Select <YES> to complete the transaction. | + | |
Inventory adjustments recorded here are simultaneously entered as a miscellaneous adjustment in your ERP system. | Inventory adjustments recorded here are simultaneously entered as a miscellaneous adjustment in your ERP system. | ||
| Line 39: | Line 41: | ||
The screen’s values will reset upon completion of the transaction and wait for the user to enter a new Tracking # value for another transaction. | The screen’s values will reset upon completion of the transaction and wait for the user to enter a new Tracking # value for another transaction. | ||
| − | The user may exit this screen by depressing the “Esc” (Escape) key or by selecting the <Back> button and pressing <Enter>. | + | The user may exit this screen by depressing the “Esc” (Escape) key or by selecting the “<Back>” button and pressing "<Enter>". |
| − | + | ||
| − | + | ||
| − | + | ==[[36:Adjust Inventory Window Settings|Adjust Inventory Window Settings]]== | |
Latest revision as of 18:11, 11 October 2006
Adjust Inventory
The first option on the Inventory menu is the Adjust Inventory function. It is used to update quantity data associated with a particular pallet. Altering this information can necessitate the need for a new pallet print tag. This screen gives the option to print a new tag upon making the change.
- NOTE
- ‘Adjust Inventory’ is only used to enter miscellaneous adjustments to your ERP system. If the quantity is incorrect because of an error when reporting production, correct the error in the Production Reporting screen (see Production Menu).
To perform adjust inventory transactions
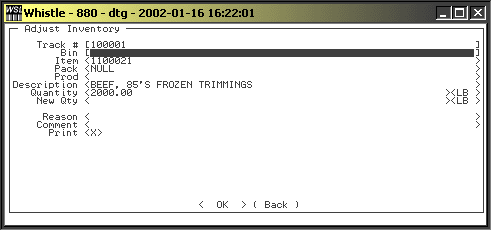
Select Adj Qty from the Inventory Menu. Scan or enter the container tracking number. You may also use Ctrl-A to begin an inventory-query based on the Find Inventory to find a particular pallet.
The system displays the bin, item/pack number, description, lot and quantity associated with the tracking number. The quantity is displayed in the standard units of measure (uom) for the item. More than one item may be associated with the tracking number. Press the ‘A’ and ‘Z’ keys to view the other items associated with the tracking number. These keys can also be used to toggle between different UOMs. Note that you can only do this if the item in question can be represented in terms of several UOMs.
Enter the new quantity (in standard uom’s) in the new quantity field.
Note: While you are in the New Quantity field, you can press Ctrl-S, and go to the Scale Window to enter the weight information, if desired.
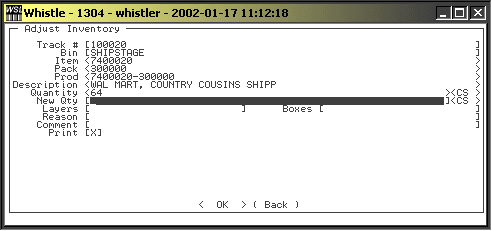
Quantities may also be entered in terms of the number of cases in a container. Make sure that the UOM field displays “CS”. This lets the program know that you are entering quantities in units of Cases. This allows the user to use the “Layers” and “Boxes” fields to enter the quantity as well.
Enter the number of layers and the number of boxes per layer in a container. A new quantity is automatically calculated from the Layers and Boxes data.
All Adjust Inventory transactions require the user to state the reason for their transaction. A list of valid reason codes is provided to aid you in selecting the proper reason. Enter the reason in the Reason field. Select a reason by pressing using the arrow key and pressing enter.
You may enter a comment in the Comment field to accompany this container. There may be a Print checkbox and Copies checkbox present. Checking the Print box instructs Whistle that the user wants to print a pallet tag for this updated container. The Copies box instructs Whistle on how many tags to print out. Highlight “<OK>” and press “Enter”.
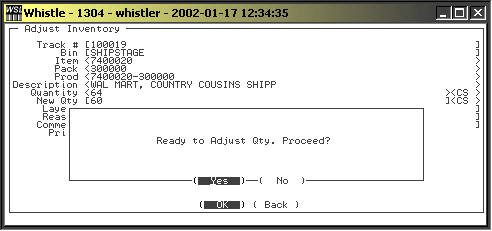
Whistle will ask if you would like to proceed with this transaction.
Select “<YES>” to complete the transaction.
Inventory adjustments recorded here are simultaneously entered as a miscellaneous adjustment in your ERP system.
The screen’s values will reset upon completion of the transaction and wait for the user to enter a new Tracking # value for another transaction.
The user may exit this screen by depressing the “Esc” (Escape) key or by selecting the “<Back>” button and pressing "<Enter>".


