Difference between revisions of "36:Data Maintenance Frames"
(→To setup or alter Vendor Pull-Date Preferences) |
(→Vendor Label Decoding) |
||
| Line 419: | Line 419: | ||
Enter the Label Key in the '''Label Key''' field. If you do not know the key, press the "?" button located next to the field. A list of the keys will be displayed. Type one in the field, or select one from the list and press "Enter". As well as filling in the '''Label Key''' field, this will fill in the scrollfield at the bottom of the screen with the various elements that make up this particular vendor label. | Enter the Label Key in the '''Label Key''' field. If you do not know the key, press the "?" button located next to the field. A list of the keys will be displayed. Type one in the field, or select one from the list and press "Enter". As well as filling in the '''Label Key''' field, this will fill in the scrollfield at the bottom of the screen with the various elements that make up this particular vendor label. | ||
| + | |||
| + | Make any changes necessary. If you are adding any elements, scroll down to the row containing the "0" element. Click on this, and the row will become editable, and a new "0" row will be added after this one. | ||
| + | |||
| + | ;Note: the last row of a vendor label must be the "0" element row. | ||
==Additional Setup Tasks== | ==Additional Setup Tasks== | ||
Revision as of 18:48, 11 July 2006
Contents
- 1 Whistle Data ERP Maintenance Frames
- 2 Whistle Data Maintenance Screen Menu
- 3 User Access Maintenance Screen
- 4 Warehouse Setup
- 5 Holds / Pull Dates Screens
- 6 Tools
- 7 Vendor Label Setup
- 8 Additional Setup Tasks
Whistle Data ERP Maintenance Frames
The bulk of Whistle System configuration is controlled through the Whistle Data Maintenance Frames. These special ERP system screens have been added to provide a quick and easy method to configure Whistle system settings. The Maintenance Screens are divided into the following categories:
- Holds / Pull Dates
- Warehouse Setup
- Picking / Putaway
- Task Scheduling
- User Access
- Tools
- Vendor Label Setup
The maintenance screen category Holds / Pull Dates allows the warehouse manager to enter all pull date, expiration date, and autohold data into Whistle. The screens included in this category are:
- The Auto Hold setup screen
- The Customer Pull Date setup screen
- The Vendor Pull Date setup screen
- View Order Setup ** Future Functionality**
The Warehouse Setup screens allow the warehouse manager to enter physical warehouse configuration data in Whistle. The following screens are included:
- Bin / Row data (#, size, location)
- Pallet Types (type, size)
- Item - Pallet Cross-Reference data (how many items on a particular pallet)
- Zone Mapping (#, location)
- Zone Priority data (preferred item locations)
- Printers info
- Module Maintenance
- Count Zones
The User Access configuration screens allow system administrators to alter individual users’ level of access to particular Whistle functions. This category is further broken into two screens:
- The individual user security screen
- The generic security template screen.
The Tools Menu contains ERP tools that are useful for running Whistle. Currently only one function is located here:
- Reconciliation
This function allows users to reconcile inventory differences between your ERP and Whistle. This ensures that both inventories will be up-to-date with each other.
Whistle Data Maintenance Screen Menu
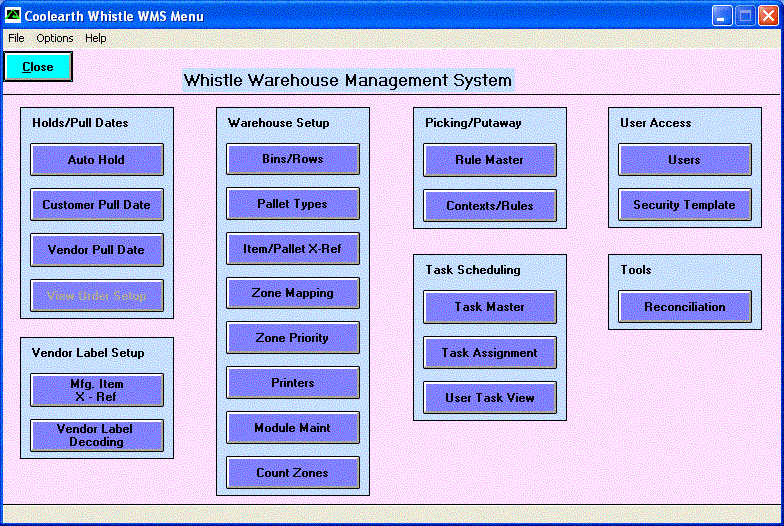
Access all Whistle maintenance screens through the Maintenance Main Menu. Remember that these are ERP system screens and can therefore only be accessed from your ERP system. Logon to your ERP system and navigate to the Whistle Maintenance Screen Main Menu. The display should look something like this:
Choose the appropriate Maintenance Screen.
Refer to the following pages for detailed information on how to use each maintenance screen.
User Access Maintenance Screen
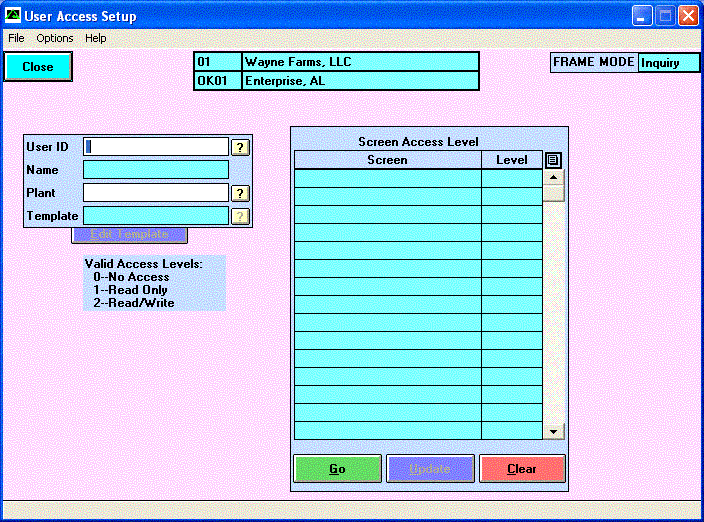
This screen is used to control the level of access that each user will have to Whistle functions. Several Whistle functions are listed in the “Screen Access Level” Box. To set security levels, enter the appropriate security level number for each Whistle function. Security levels range from 0-2. 0 corresponds to ‘no access’. 2 corresponds to ‘full access’. 1 means ‘limited access’ and is infrequently used. The screen should look something like this:
To setup or alter user access levels
Enter the User ID of the user in question. If you do not know the user’s ID, press the ‘?’ next to the UserID field to view a list of all user IDs.
The user’s security information will populate the “Security Access Level” screen. If you would like to alter any of the user’s security information, select UPDATE from the Options pull-down menu. You may alter a user’s security settings in two ways...
You may alter the particular user’s settings directly via the “Screen Access Level” box. Simply change the appropriate access levels one at a time.
Choose the appropriate User template to create all new security settings for this user. Do this by pressing the ‘?’ button to the right of the template field.
A user template is a generic set of user access levels set for each type of warehouse employee. These templates allow the Maintenance Screen User to easily set an employee’s access levels without having to enter each access level individually. For instance, if Jane Doe is a shipping employee, the maintenance screen user simply chooses “Shipping Employee” in the template section to load the appropriate Whistle Access levels for Jane.
- NOTE
- If you choose not to load a template for a particular user, the maintenance screen will by default set all levels to 0 (no access).
- NOTE
- You may manually alter the user’s settings once a template is loaded.
- NOTE
- Only 0, 1, and 2 are appropriate access levels. 0 means “no access. 1 means “limited access”, and 2 stands for “full access”.
Select the Update button once you are satisfied with the particular user’s settings. The user security settings will now be updated. Select Clear to clear all fields and start over.
To Create or Alter Security Maintenance Templates
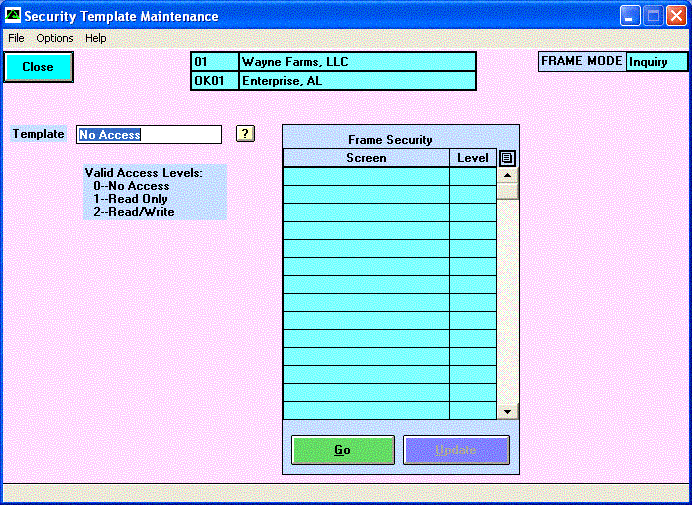
As mentioned the previous section, security maintenance templates are used to set default generic security access levels for each type of employee. This screen is used to create and alter these templates. The security template screen should look something like this:
Choose the appropriate template in the “template” box. If you are creating a new template, type name of the new template. Choose Update from the Options pull-down menu. Alter the appropriate Access Level settings in the “Frame Security” box.
- NOTE
- Only 0, 1, and 2 are appropriate access levels. 0 means “no access. 1 means “limited access”, and 2 stands for “full access”.
If you are satisfied with security template settings, select “Update”. The security templates will now be updated.
Warehouse Setup
Bin Setup Screen
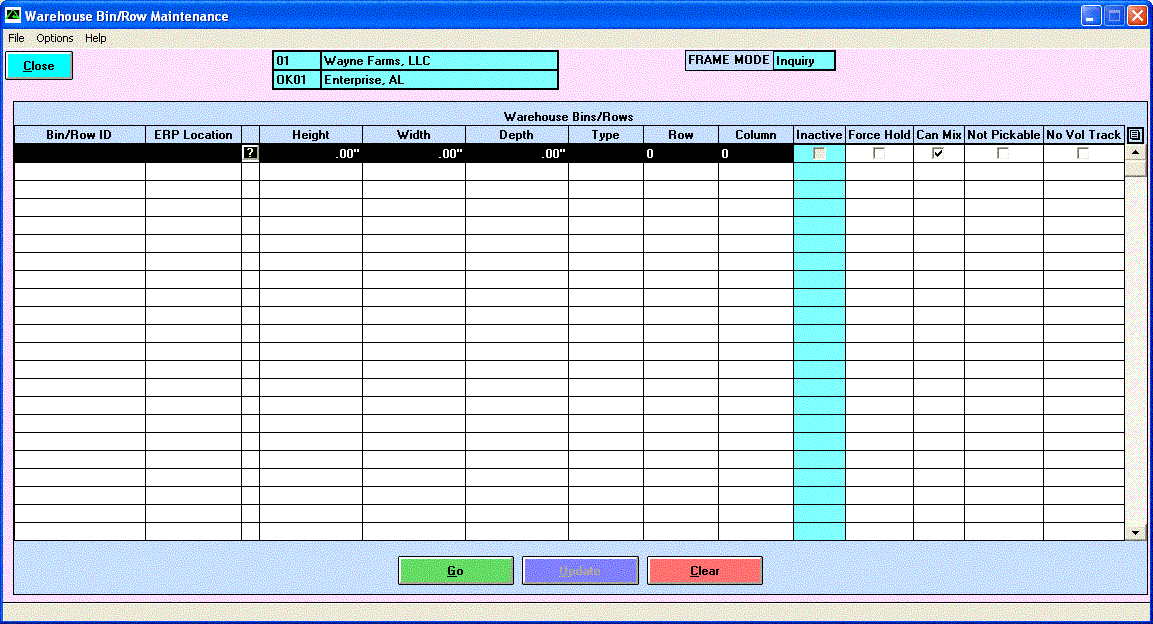
The Whistle bin setup maintenance screen is used to enter all Bin parameters and characteristics into Whistle. The parameters are as follows: Name, Zone location, Height, Width, Depth, and Type, among others. The Bin setup screen looks something like this:
To view Bin setup information
Select the “Go” button from the bottom of the screen. The table will populate with a complete list of all Bins entered in the warehouse. To Enter Bin Setup info into Whistle: A new line entry must be created for every Bin in the warehouse. The initial setup will take some time, but thankfully it will only have to be done once.
Select "Update" from the Options pull-down menu. Find an empty row to enter all new Bin information. Empty rows are located at the end of all populated rows. Enter a Bin ID in the first column. Enter the Bin’s Location. You may select the ‘?’ button to view a list of available locations. Enter the Bin dimensions: Height, Width, and Depth.
These Bin dimensions will be used to calculate how many pallets can fit in a particular Bin. Enter the Bin Type in the last column. This field is for narrative descriptive purposes only. Select the Inactive box if you would like to temporarily de-activate the Bin (remove it from the system). You may only do this as long as the Bin is empty. Perform steps 2 - 6 until you have successfully added or edited all relevant Bins. Select “Update” to process your Bin transactions.
Pallet Type Setup
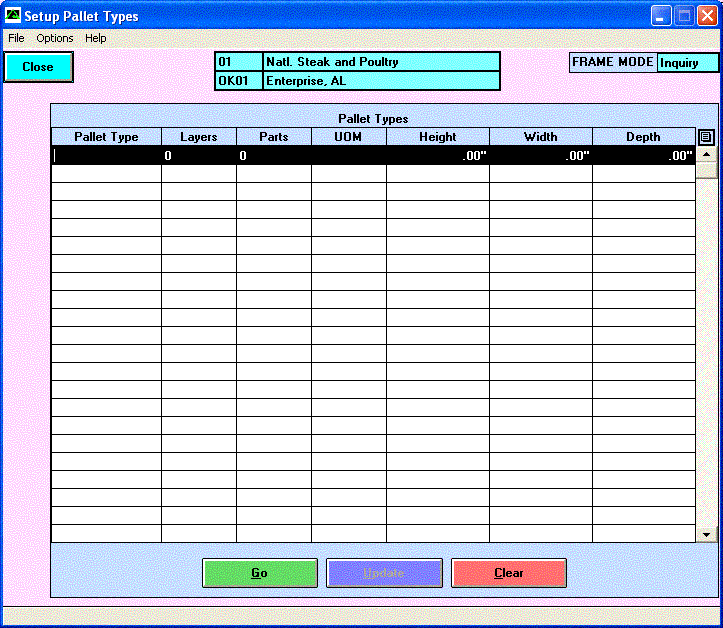
Whistle needs to know the size, shape, and overall load characteristics of all pallets. It uses this information to calculate a) how many items can be placed on a pallet and b) if the particular pallet will fit a particular Bin. The Whistle maintenance pallet type setup screen should look something like this:
To view Pallet setup information
Select the “Go” button from the bottom of the screen. The table will populate with a complete list of all Pallets entered in the warehouse. To Create or Alter Pallet Types A new line entry must be created for every Pallet type. The initial setup will take some time, but thankfully it will only have to be done once.
Select Update from the Options pull-down menu.
Find an empty row to enter all new Pallet information. Empty rows are located at the end of all populated rows. Enter a Pallet Type in the first column. Enter the Pallet Type in the first column. Enter the number of Layers that will fit on this pallet.
Refer to the glossary for an explanation of the ‘layers’ terminology. Enter the # of Parts and corresponding Unit of Measure (UOM) that fit on the pallet. Lastly, enter the pallet’s dimensions: Height, Width, and Depth. Repeat steps 2 - 5 for all appropriate pallets. Select the “Update” button to complete the transaction. The appropriate Whistle tables will be updated.
Pallet Type Cross-Reference Screen
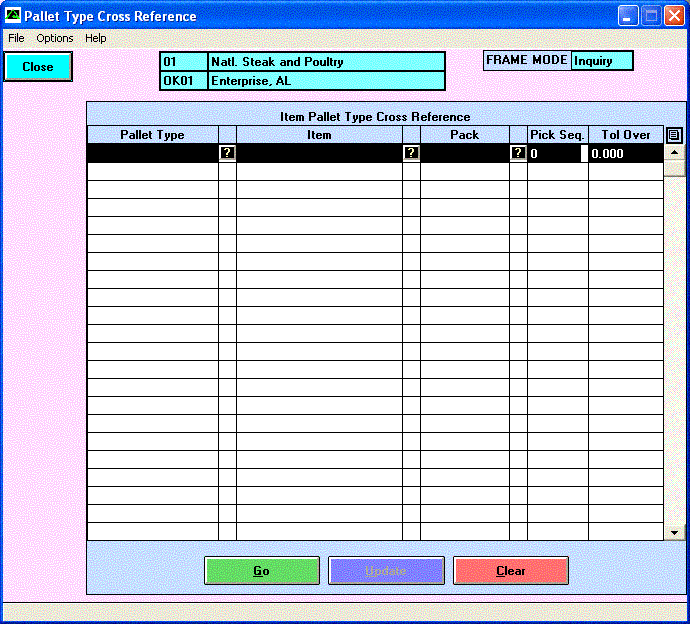
Whistle contains a table that stores information on Item Pack – Pallet Type relationships. Each item pack is best suited to be placed on a particular pallet type. This relationship is governed by the size and shape of the item packs. Whistle uses this information to determine a) how a particular item is to be loaded on a pallet and b) the dimensions of the particular pallet.
To use this screen, the user enters an existing pallet type (see previous section) and an item or an item pack. One pallet type may be linked to many items and item packs. Conversely, there may only be one pallet type for each item pack. The Item-Pallet setup screen should look something like this:
To view Pallet Cross-Reference Information
Select the “Go” button from the bottom of the screen. The table will populate with a complete list of all Pallet Cross-References entered in the warehouse. To Add or Alter Item – Pallet Relationships: A new line entry must be created for every Pallet - Pack relationship. The initial setup will take some time, but thankfully it will only have to be done once.
Select Update from the Options pull-down menu.
Find an empty row to enter all new Pallet information. Empty rows are located at the end of all populated rows. Select the pallet type for a particular item or item pack. You can use the ‘?’ button to select from a list of Pallet Types. Enter the Item # that is to be linked to the particular pallet type. Enter the Pack # that is to be linked to the particular Pallet Type and Item#.
- NOTE
- You may enter multiple item-pack entries (each on a different line, each different) for a particular item – pallet type relationship. In the above example, the first two lines describe the same Pallet - Item relationship, but with different forms of packaging. Item # 110339 can be placed on a pallet of type 16oz_8x13 in two different ways: with Pack # 49180A and Pack # 49369A.
Repeat steps 2 - 4 until the appropriate item - pack - pallet type relationships are entered. Select “Update” to complete this transaction. Whistle will update the appropriate database tables.
Zone Setup Screen
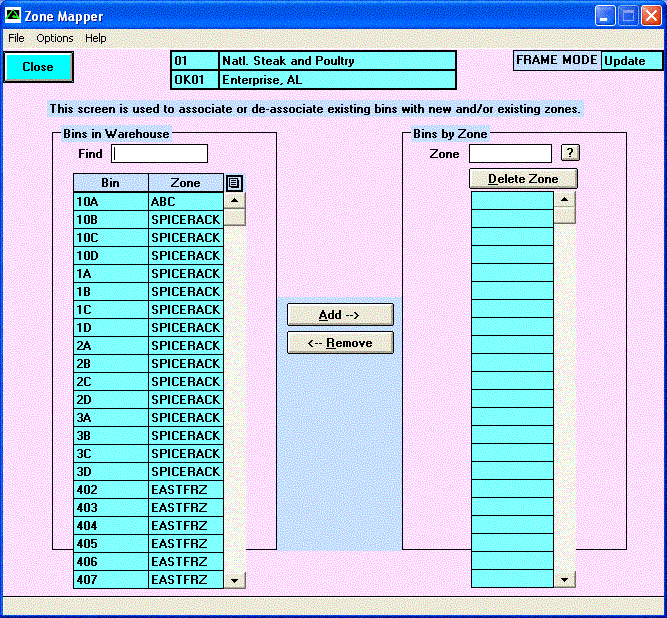
This maintenance screen is used to name zones and link all Bins to a particular zone. The screen should look something like this:
To Setup or Alter Zones
Enter the Zone name in the second column. If you do not know the name of the zone, press the ‘?’ button to view a list of available zones. Enter the Bin # that is being added to this zone.
To find the Bin#, type in the first character or two in the find field and press Enter. A list of Bins that start with the desired characters is displayed. If you would like to view a list of all Bins, simply leave the “find” field blank and press “Enter”. Select the appropriate bin and press “Add”. Repeat these 2 steps until all Bins within a particular zone have been entered.
- NOTE
- A bin may only be associated with one zone! Conversely, many bins may be located in a particular zone.
Zone Priority Setup Screen
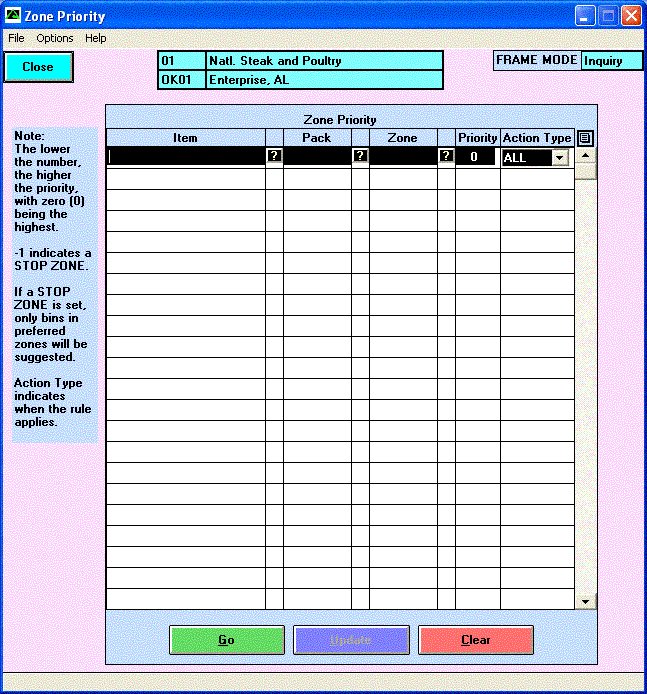
Every item or item pack needs to have a preferred storage location within a warehouse. This screen is used to enter such information. Whistle uses this information to determine the best location from which to choose or in which to place a particular item. This zone priority should look like this:
To view Zone Priority Information
Select the “Go” button from the bottom of the screen. The table will populate with a complete list of all Zone Priority information entered in the warehouse. To Setup or Alter Zone Priorities: A new line entry must be created for every Item - Pack - Zone relationship. The initial setup will take some time, but thankfully it will only have to be done once.
Select Update from the Options pull-down menu.
Find an empty row to enter all new information. Empty rows are located at the end of all populated rows. Select the Item # that you want to link to a particular zone. Press the ‘?’ to view a list of available item numbers. Enter the desired Pack #. Press the ‘?’ to view a list of available pack numbers.
- NOTE
- Item Pack may only have one zone priority. Conversely, many item packs may share the same zone priority setting.
Enter the zone preference for a particular item or item pack. Repeat steps 2 - 4 for each entry. Select “Update” to complete the transaction. Whistle will update the appropriate system tables.
Warehouse Printer Setup Screen
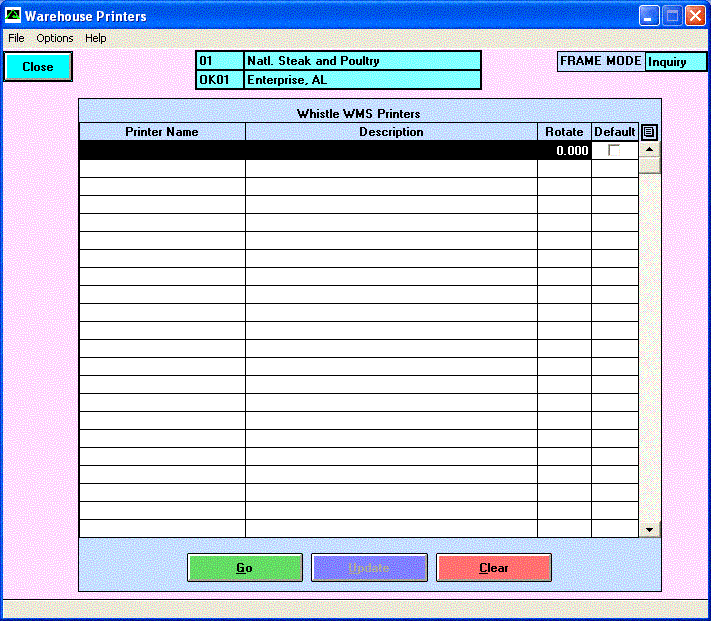
This screen is used to add and/or remove printers from the Whistle database. Whistle can only print to printers that are located in this table. Three fields comprise this table: “Printer Name”, “Description”, and “Default”.
To view Warehouse Printer Settings
Select the “Go” button from the bottom of the screen. The table will populate with a list of all printers currently set up in your warehouse. To setup or alter Warehouse Printer Settings: A new line entry must be created for every new printer. Select Update from the Options pull-down menu.
Find an empty row to enter all new information. Empty rows are located at the end of all populated rows.
To add a printer
Type in the Exact Name of the printer in the “Printer Name” category. This name must exactly match the name of the printer as it is entered in the local computer settings.
Type in the Printer Description. This field can contain anything you like. It is useful in describing a printer when it’s Printer Name is ambiguous.
Check the default box if you would like this printer to be the default printer.
- NOTE
- Only one printer may be selected as the default printer!
You may alter other printer settings by directly changing the information located in these three fields. Select the UPDATE button from the bottom of the screen to finalize your changes. A screen should pop up confirming if the changes were successful. Select Close in the upper-lefthand corner to exit the printer setup screen.
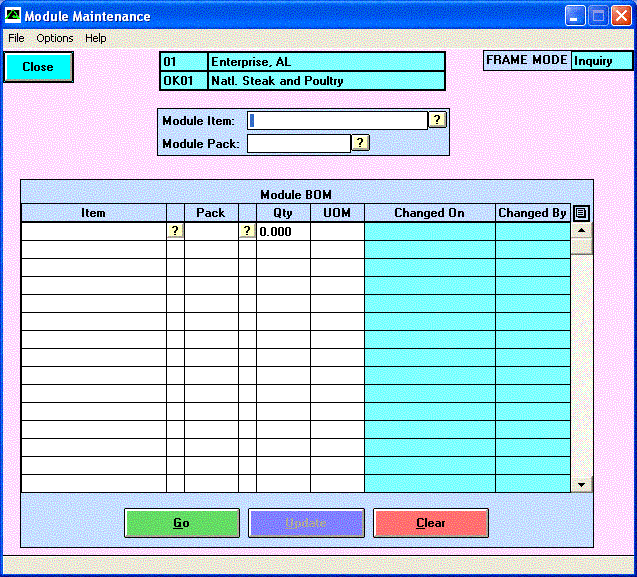
Module Maintenance Screen
This screen is for updating an existing module or kit. A module is the result of adding different items and packs together, to create a completely new item.
Count Zones
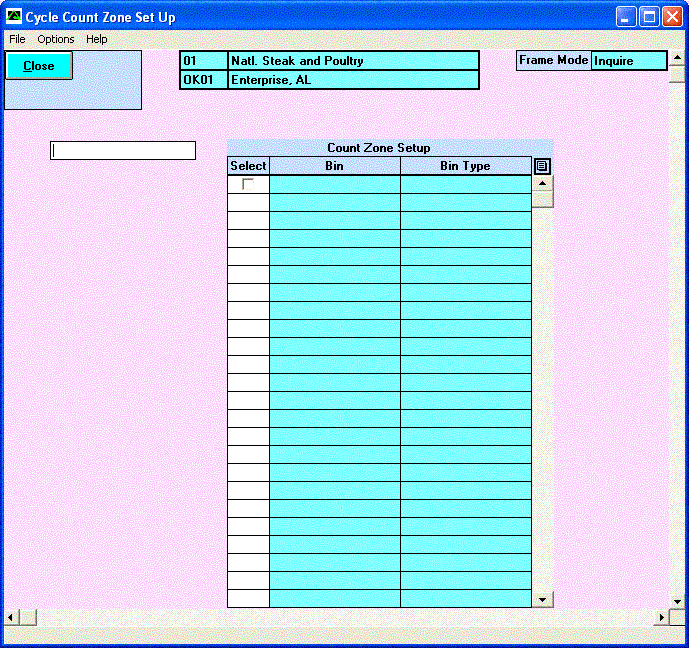
This screen is for maintenance of the zones used in Cycle Counting. The Options drop down menu at the top of the screen allows you to choose between Inquiring, Adding, Updating, or Deleting a Cycle Count zone.
- Note
- These zones are for Cycle Counting only. They are not the same as the zones set up above.
To add a zone
Select the "Add" option from the Options drop down menu at the top of the screen. Enter the new zone name in the blank text field. The Count Zone Setup area should fill with a list of all of the bins and bin types available. To set up the zone, select the bins to be included in that zone by checking the box in the Select column next to the desired bin. When all of the bins have been selected, press the "Add" button to create the zone.
Holds / Pull Dates Screens
AutoHold Setup Screen
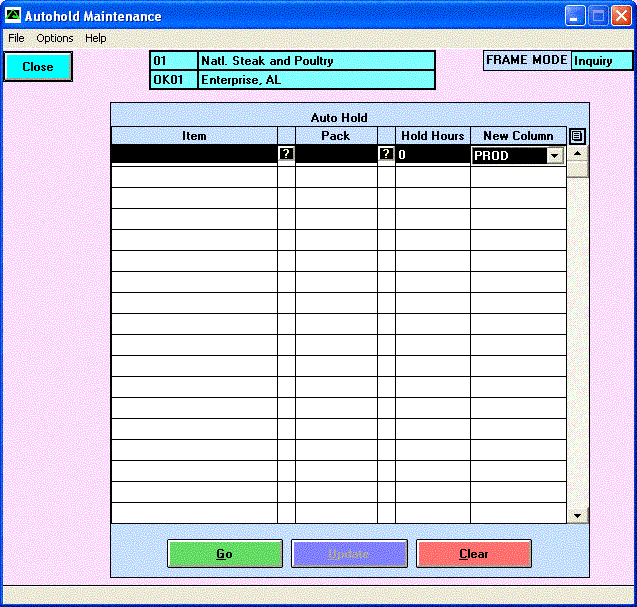
Certain items manufactured in a warehouse must stay in the warehouse for a specified time before they are shipped. Sour Cream, for example, must often have time to “set” or “stabilize” before it is shipped to stores. This screen is used to automatically place holds on such items, ensuring that they are never shipped at the wrong time. The autohold screen should look something like this:
To view AutoHold Settings
Select the “Go” button from the bottom of the screen. The table will populate with a list of current AutoHold settings. To setup or alter AutoHold Preferences: A new line entry must be created for every new AutoHold setting. Select Update from the Options pull-down menu.
Find an empty row to enter all new information. Empty rows are located at the end of all populated rows. Enter the appropriate Item. Enter the appropriate Item Pack #. Enter the Autohold time, in hours. Repeat this process for all items in question. Select “Update” to complete this transaction. Whistle will automatically update the necessary tables.
Customer Pull-Date Constraint Screen
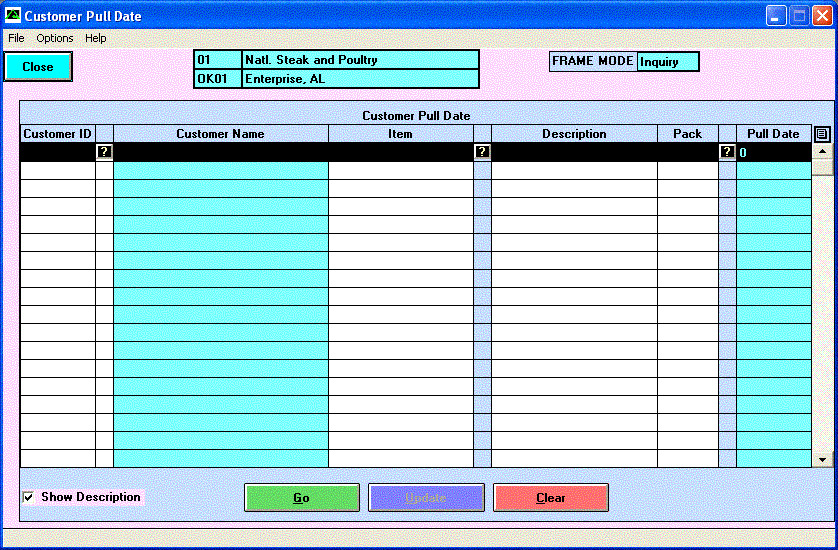
This screen is used to set limits as to what particular item pull-dates customers are willing to accept from you. Information entered into this screen will help determine the appropriate items you will send to customers. This screen allows you to automatically ensure that the items you ship will be of satisfactory quality to your customers. The customer setup screen should look similar to this:
To view Customer Pull-Date Settings
Select the “Go” button from the bottom of the screen. The table will populate with a list of current Customer Pull-Date settings. To setup or alter Customer Pull-Date Preferences: A new line entry must be created for every customer. Select Update from the Options pull-down menu.
Find an empty row to enter all new information. Empty rows are located at the end of all populated rows.
Enter the appropriate Customer # in the first column.
The Vendor’s name will automatically be populated. Enter the Pull-Date, in the minimum number of days prior to an item’s pull-date that the customer is willing to accept. Repeat the previous 2 steps for each customer in question. Select “Update” to complete this transaction. Whistle will automatically update the appropriate tables.
Vendor Pull-Date Screen
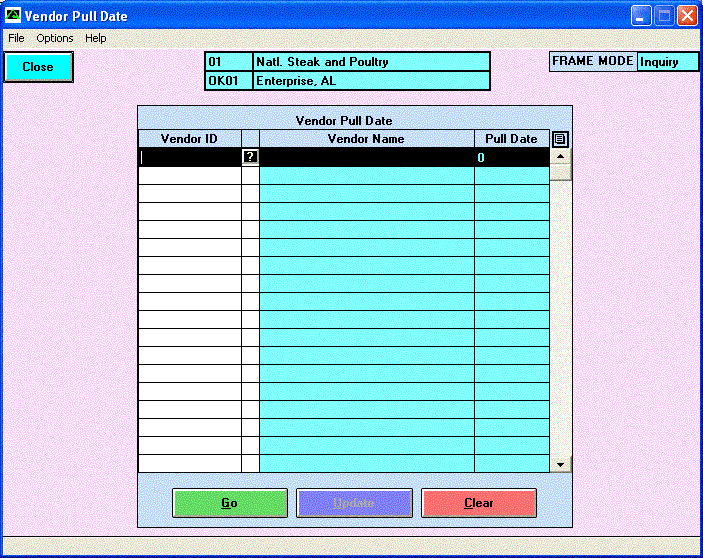
This screen is used to set limits as to what particular item pull-dates you are willing to accept from specific vendors. Often items that enter a warehouse are not used immediately. This screen allows you to automatically ensure that the items you receive will be able to tolerate the time spent on your shelves. The vendor setup screen should look similar to this:
To view Vendor Pull-Date Settings
Select the “Go” button from the bottom of the screen. The table will populate with a list of current Vendor Pull-Date settings.
To setup or alter Vendor Pull-Date Preferences
A new line entry must be created for every vendor. Select Update from the Options pull-down menu.
Find an empty row to enter all new information. Empty rows are located at the end of all populated rows. Enter the Vendor # in the first column.
The Vendor’s name will automatically be populated. Enter the Pull-Date limit for that particular vendor.
The pull date limit must be entered as the maximum number of days prior to an item’s pull-date. Any item entering the warehouse with less than “X” #of days before the pull-date will automatically be returned to the vendor.
Repeat the previous 2 steps for all appropriate vendors.
Select “Update” to complete this transaction. Whistle will update the appropriate tables.
Tools
Reconciliation Screen
The Whistle “Reconciliation Screen” is used to reconcile any inventory discrepancies between Whistle and your ERP System. Sometimes transactions processed by your ERP may go unnoticed in Whistle, or vice-versa. This screen is designed to eliminate any such discrepancies. The Whistle Reconciliation Screen should be run at least once a day!!! This will ensure that any and all discrepancies are resolved in a timely manner and both inventories are always synchronized.
To run Reconciliation Transactions
Select Reconciliation from the main WSL menu.
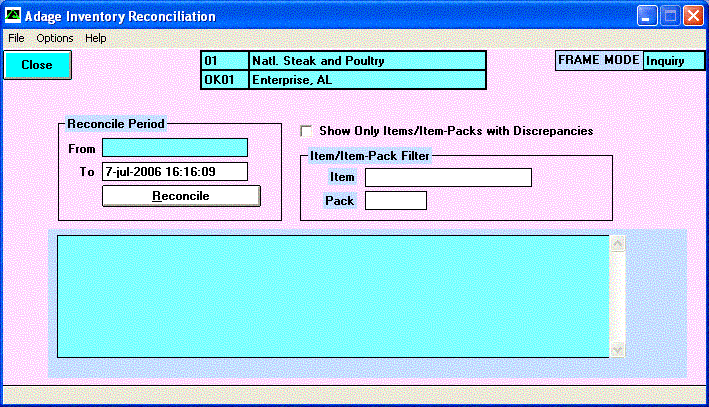
The following screen will be displayed.
The main reconciliation screen allows you several options in how you are going to reconcile inventory discrepancies.
Set the appropriate options for how you want to view reconciliation query results. You can view...
All Item/Item-Pack combinations
Uncheck the “Show Only Items / Item-Packs with Discrepancies” box to select this option.
Only Item/Item-pack combinations with discrepancies
Check the “Show Only Items / Item-Packs with Discrepancies” box to select this option.
By Item Number
Enter the particular Item Number for which you are interested in settling discrepancies.
By Item Number - Pack Number combinations
Enter the particular Item Number and Pack Number combination for which you are interested in settling discrepancies. Select the "Reconcile" button to run the queries and see the discrepancy results.
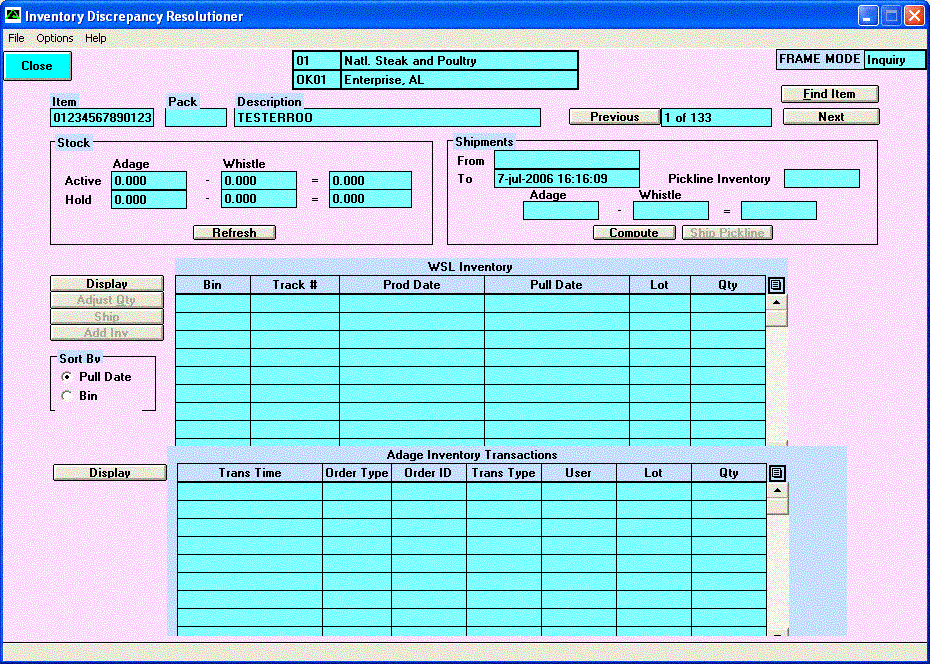
The Inventory Discrepancy Resolutioner screen will appear...
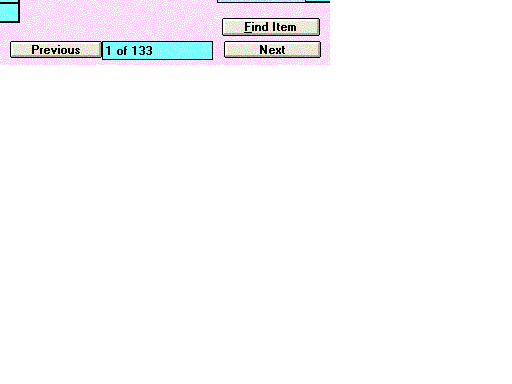
In the example on the right, 133 Item - Pack combinations were returned by the query. Choose the Item - Pack that you would like to view by using the "Previous" and "Next" buttons. You may also use the "Find Item" button to select from a list of Item Numbers included in the result set.
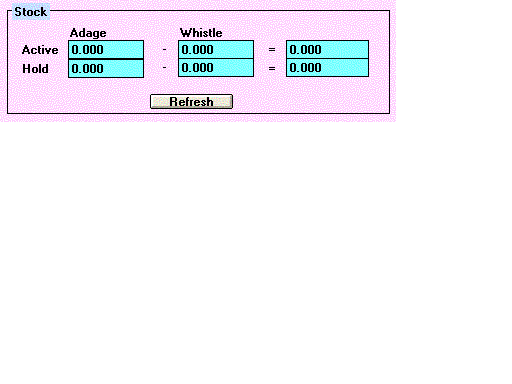
The Stock window will display your basic inventory results. This basic information includes the numbers of item - packs in both the ERP and Whistle databases that are active and on hold. This window also displays the difference in inventories if one does exist. Select the "Refresh" button to update this information.
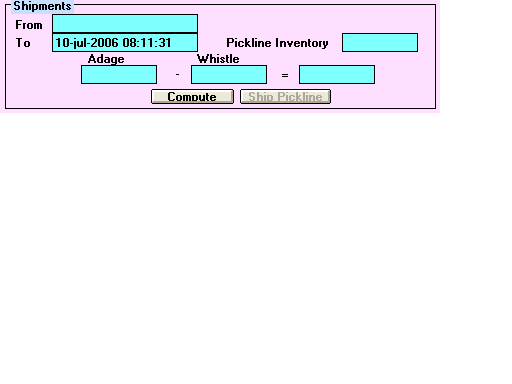
You may view a list of all shipments made from both your ERP and Whistle that involved the Item - Pack in question. Often inventory discrepancies arise from shipping transactions that occur in one system and not the other. They can often be resolved using this simple shipment window. To display a list of item - packs shipped from both the ERP and Whistle databases, select the "Compute" button. The Whistle database may state that there were less Item - Packs shipped than from your ERP if Item - Packs were not recorded as moved off of the Pickline in Whistle. Select the "Ship Pickline" button to record Item - Packs as having been moved off of the Pickline.
- NOTE
- This may only be done if there is a greater or equal number of items on the pickline to resolve this discrepancy.
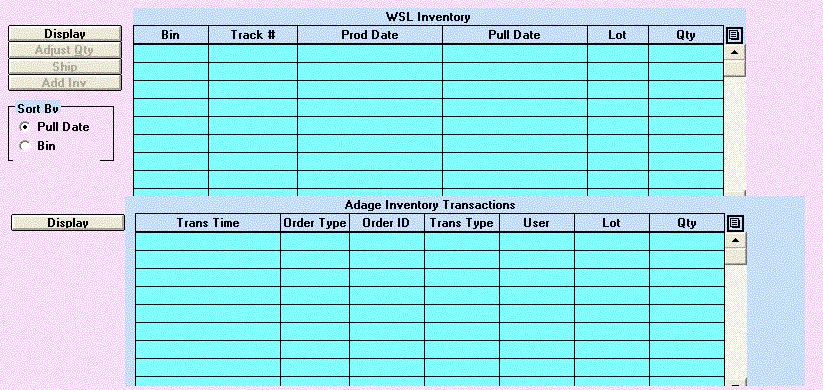
Select the "Display" button to the left of the WSL Inventory window to view a list of all bins and tracking numbers of the particular Item - Pack number in the Whistle inventory.
Select the "Display" button to the left of the ERP Inventory Transactions window to view a list of all ERP transactions that relate to the particular Item - Pack numbers.
The results displayed in the above two windows should tell you the whole story of why the inventory discrepancies exist. At this point you may either go Whistle to update the appropriate inventories or simply select the "Update" button in the upper-lefthand corner of the screen to reconcile the inventory discrepancies.
Vendor Label Setup
Mfg. Item Cross Reference
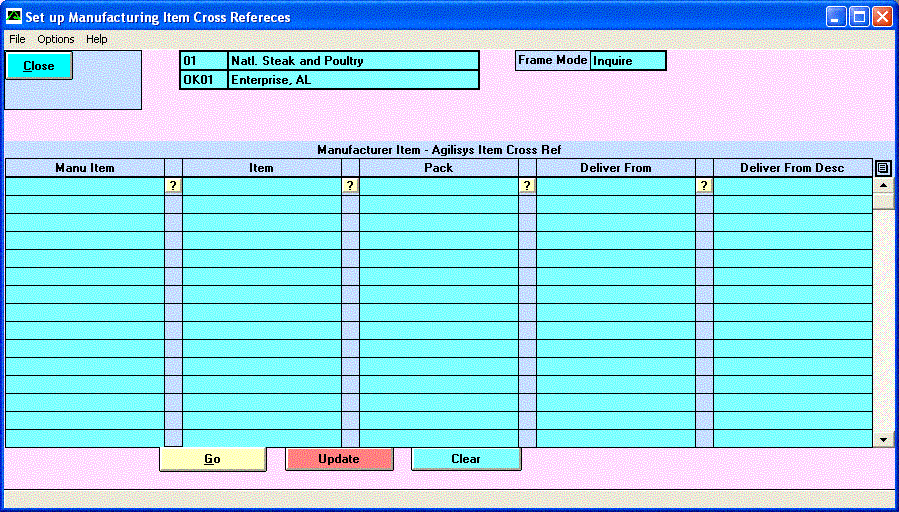
This screen is used for maintaining the manufacturing item cross references. The screen should look something like this:
Press the "Go" button. The screen will fill with all of the currently entered manufacturing item cross references.
To add a new cross reference
Using the scroll buttons on the right side of the Manufacturing Item - Agilisys Item Cross Ref field, scroll down to the bottom of the list.
Position the cursor in the last row, first column. Enter the information in the fields. You can either type it in directly, or press the "?" button next to the column, and select an entry from the displayed list. When you are finished entering the data, press the "Update" button to save your data.
To update a cross reference
Press the "Go" button to display the existing Manufacturing items. Select the item to be updated. Make any needed changes to that line in the list. When you have finished, press the "Update" button to save your changes.
Vendor Label Decoding
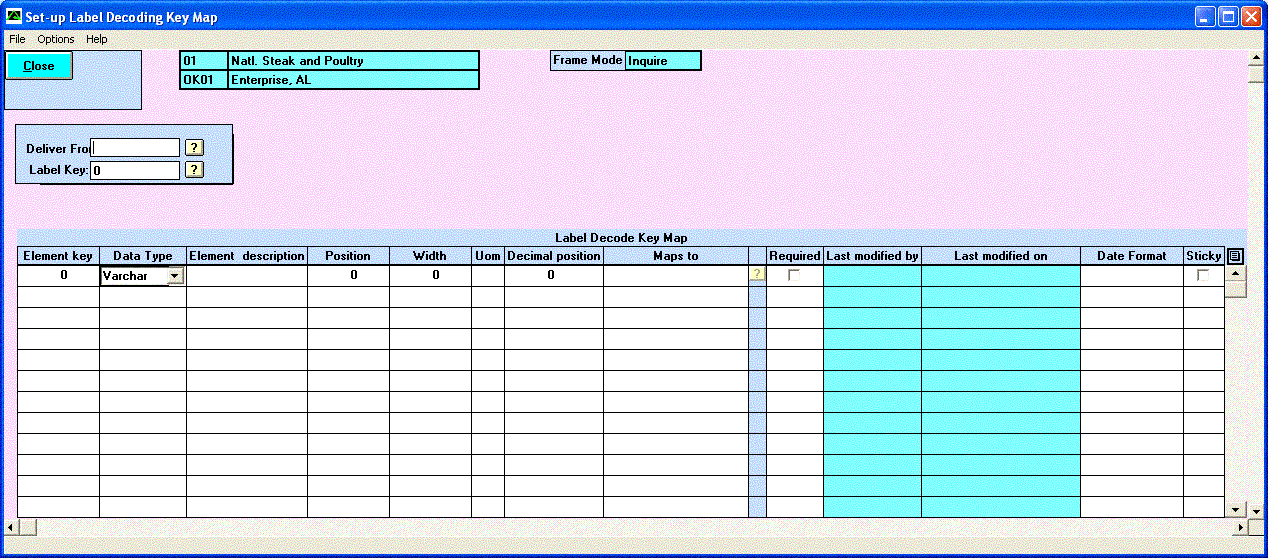
This screen is for setting up the various fields that make up a vendor label. This is what is used to parse out the fields of a vendor label that is scanned in Whistle.
To view or update a vendor label mapping
Enter the customer number in the Deliver From field. If you do not know the number, press the "?" button located next to the field. A list of the customer numbers will be displayed. Type one in the field, or select one from the list and press "Enter".
Enter the Label Key in the Label Key field. If you do not know the key, press the "?" button located next to the field. A list of the keys will be displayed. Type one in the field, or select one from the list and press "Enter". As well as filling in the Label Key field, this will fill in the scrollfield at the bottom of the screen with the various elements that make up this particular vendor label.
Make any changes necessary. If you are adding any elements, scroll down to the row containing the "0" element. Click on this, and the row will become editable, and a new "0" row will be added after this one.
- Note
- the last row of a vendor label must be the "0" element row.
Additional Setup Tasks
so_brprd_ext table adjustments
Adage contains a table called the so_brprd_ext table. This table stores unit-of-measure (uom) information regarding the relationship between “cases” and “eaches”. This is where you tell Whistle just how many items are located in each case. Whistle uses this information when a user enters information in terms of cases.
In order to implement this functionality, a column (so_brprd_unitpcs ) must be added to the so_brprd_ext table. The following instructions will demonstrate how to do this.
To add the appropriate column
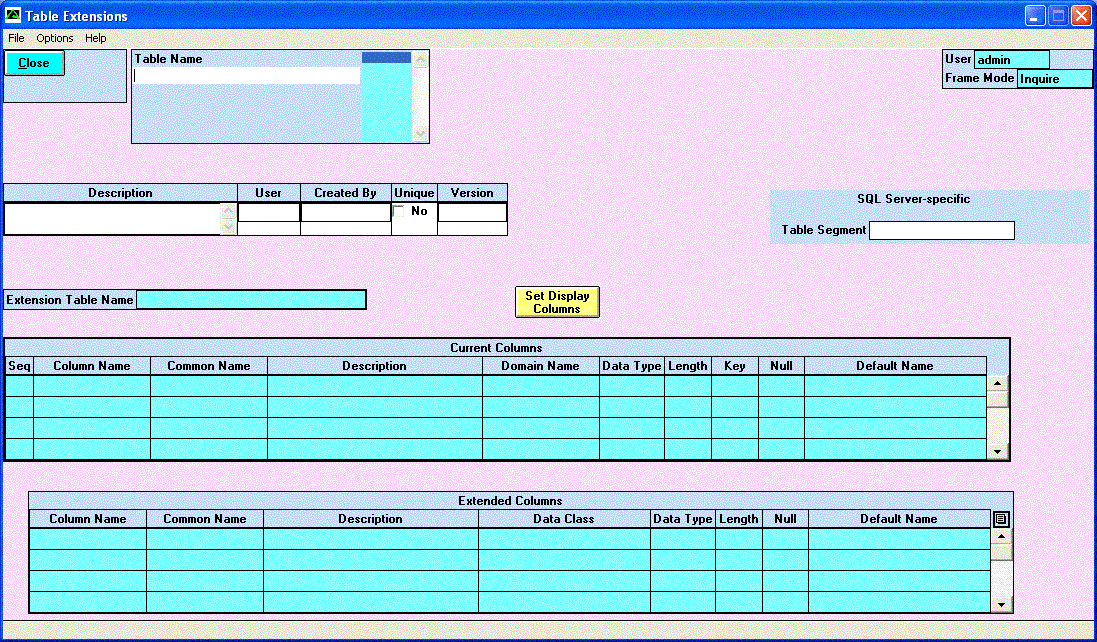
Open the Systems Administration menu from the ERP main menu. Choose the Table Extension option from the menu.
You must next enter the name of the table that you would like to alter. Type so_brprd_ext in the Table Name field. Press the <Enter> key. The ERP will populate the screen with information regarding this database table. To choose from a list of available table names, click on the dark bar in the upper-righthand corner of this field. Select so_brprd_ext to choose this table.
The ERP will fill in all existing table information into the current table extension screen.
Go to the scrollfield box at the bottom of the screen. It is labeled Extended Columns.
Using the scroll buttons on the right side of the Extended Columns field, scroll down to the bottom of the columns list. Position the cursor in the last row, first column. Type in the following information:
Column Name: “so_brprd_unitpcs”.
Common Name: “Cases per Pallet”.
Description: “Cases per Pallet”.
Data Type: Choose “SIZE” as the appropriate Data Type from the pull - down menu.
Check the NULLS box so that it is checked and reads “YES”.
Select UPDATE from the upper left - hand corner of the Table Extension screen to complete this transaction. The ERP will update the appropriate tables. Whistle will now be able to convert units of measure from cases (CS) to eaches (EA) and vice - versa.
Setting Unit of Measure (UOM) relationships
Now that you’ve got the so_brprd_ext table properly set up, you can go ahead and enter all of your UOM relationships (Cases to Eaches). This is done using the Branch Product Additional Info screen.
To Enter UOM Relationships
Choose “Company” from the main ERP pull - down menu. Select “Sales Management” from the Company Menu.
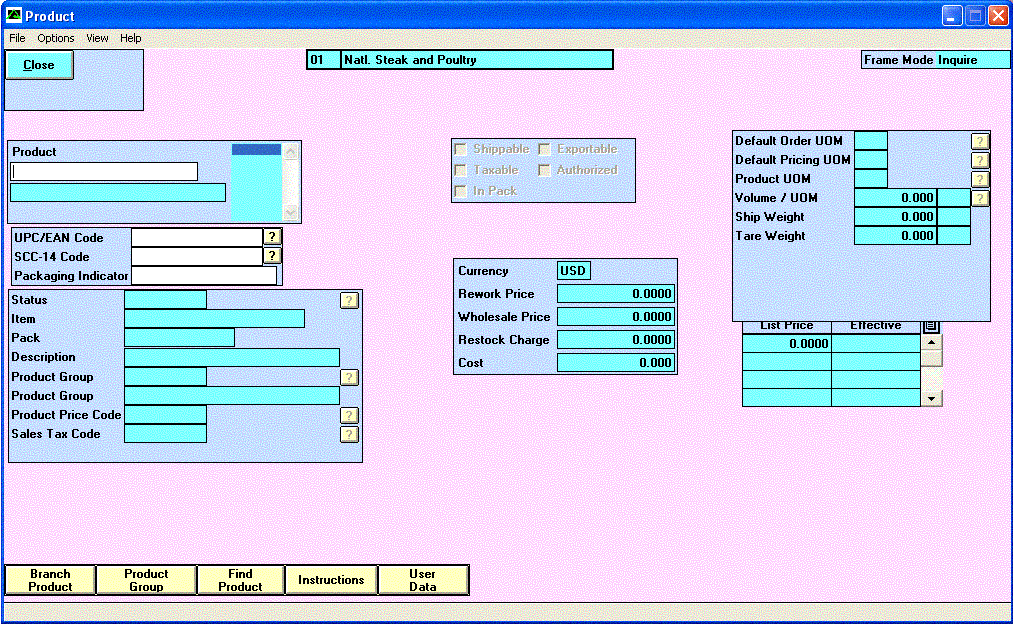
Select “Product” from the Sales Management Menu.
Enter the Product Number of the item for which you want to set up a UOM relationship.
- NOTE
- If you do not know a particular product number, you can click on the dark box in the upper - righthand corner of the Product ID box (shown above) to choose from a list of available Product ID #s.
Select the "Branch Product" button from the bottom of the screen. The ERP will take you to the Branch Product Maintenance screen.
Select the "User Data" button from the lower section of this screen. The ERP will now take you to the Branch Product Additional Info screen where you can enter the appropriate UOM information.
Select "Update" from the Options pull - down menu in screen’s toolbar. This will allow you to update the current product’s information.
There are two unit of measure (UOM) relationships that you can set in this screen:
The number of cases per pallet
The number of units per case.
Enter the appropriate UOM relationships that you would like to set for this particular item.
Select "Update" to complete your transaction.
