Difference between revisions of "GS:Report Production Window"
| Line 7: | Line 7: | ||
==To Report Production== | ==To Report Production== | ||
Select Report Prod from the Production menu. | Select Report Prod from the Production menu. | ||
| + | |||
| + | [[Image:ReportProduction1.gif|Image:ReportProduction1.gif]] | ||
| + | |||
Enter the '''order number''' for the item being produced. You can view a list of ERP system pack orders by pressing the 'Control' and 'A' keys together or sequentially (handheld unit). | Enter the '''order number''' for the item being produced. You can view a list of ERP system pack orders by pressing the 'Control' and 'A' keys together or sequentially (handheld unit). | ||
| + | Select the order from the display by either pressing the '''line number''' or highlighting the line and pressing <Enter>. | ||
| + | |||
| + | [[Image:ReportProduction3.gif|Image:ReportProduction3.gif]] | ||
| − | |||
Whistle will automatically load all order information into the appropriate fields on the screen. A full container quantity for the item will be displayed. It will also display a line showing the number of containers expected to be reported, and how many have already been reported. | Whistle will automatically load all order information into the appropriate fields on the screen. A full container quantity for the item will be displayed. It will also display a line showing the number of containers expected to be reported, and how many have already been reported. | ||
| − | + | ;NOTE: If you are reporting production of catchweighted items, you need to highlight <Ok> and press "Enter" now. You will be taken to the Report Production - Catchweight screen. See the next section for details. | |
| − | + | ||
'''Scroll down''' to the 'Track #' field. | '''Scroll down''' to the 'Track #' field. | ||
A new tracking number is normally generated by Whistle. The only time you need to enter this field manually is when 1) the label printer is not working or the system is down, or 2) You would like to add items to an existing container. If (1) occurs, use a preprinted bar code label and enter (or scan) the number from the label. [Note: Whistle will accept any character string as a valid tracking number as long as it was not previously used.] Whistle will simply display '**NEW**' if a new tracking number is to be generated. The actual tracking number will be displayed when you are finished reporting the container. | A new tracking number is normally generated by Whistle. The only time you need to enter this field manually is when 1) the label printer is not working or the system is down, or 2) You would like to add items to an existing container. If (1) occurs, use a preprinted bar code label and enter (or scan) the number from the label. [Note: Whistle will accept any character string as a valid tracking number as long as it was not previously used.] Whistle will simply display '**NEW**' if a new tracking number is to be generated. The actual tracking number will be displayed when you are finished reporting the container. | ||
| + | |||
| + | [[Image:ReportProduction2.gif|Image:ReportProduction2.gif]] | ||
Enter the Quantity that you are reporting. Simply scroll through this field if you are in agreement with the default quantity displayed. | Enter the Quantity that you are reporting. Simply scroll through this field if you are in agreement with the default quantity displayed. | ||
| Line 23: | Line 29: | ||
Enter the '''Lot''' and '''Pull Date'''. | Enter the '''Lot''' and '''Pull Date'''. | ||
The shift supervisor may print a bar-coded sheet to allow the fork truck operator to scan lot numbers and pull dates. Use the bar code scanner to enter information quickly and accurately. There are two acceptable Pull Date formats: YYYY-MM-DD and MM-DD. Note: When in MM-DD format, Whistle will automatically use the current year if the current date is prior to the pull date, otherwise, Whistle will default to the next year. | The shift supervisor may print a bar-coded sheet to allow the fork truck operator to scan lot numbers and pull dates. Use the bar code scanner to enter information quickly and accurately. There are two acceptable Pull Date formats: YYYY-MM-DD and MM-DD. Note: When in MM-DD format, Whistle will automatically use the current year if the current date is prior to the pull date, otherwise, Whistle will default to the next year. | ||
| + | |||
| + | [[Image:ReportProduction4.gif|Image:ReportProduction4.gif]] | ||
Once all of the information has been entered, highlight '''<OK>''' and press the '''<Enter>''' key. | Once all of the information has been entered, highlight '''<OK>''' and press the '''<Enter>''' key. | ||
You may get a verification dialog, asking if you want to proceed. This is your last chance to verify that the information entered on the screen is correct. Press <Yes> to continue, or highlight <No> and press <Enter> to return to setting to the previous screen to make any necessary corrections. | You may get a verification dialog, asking if you want to proceed. This is your last chance to verify that the information entered on the screen is correct. Press <Yes> to continue, or highlight <No> and press <Enter> to return to setting to the previous screen to make any necessary corrections. | ||
| + | |||
| + | [[Image:ReportProduction5.gif|Image:ReportProduction5.gif]] | ||
| + | |||
Containers may be put away as soon as they come off of the production line. Whistle will ask if you would like to put away containers every time you report a production. Notice that at this point, Whistle will display the tracking # of the container that was just produced. If <Yes> is selected, Whistle will take the user to the Putaway screen. Refer to that section of this guide for more information concerning Putaway. If <No> is selected, you remain in the Report Production window to report production of another container. | Containers may be put away as soon as they come off of the production line. Whistle will ask if you would like to put away containers every time you report a production. Notice that at this point, Whistle will display the tracking # of the container that was just produced. If <Yes> is selected, Whistle will take the user to the Putaway screen. Refer to that section of this guide for more information concerning Putaway. If <No> is selected, you remain in the Report Production window to report production of another container. | ||
| Line 35: | Line 46: | ||
==To Report Catchweighted Production== | ==To Report Catchweighted Production== | ||
If you are reporting catchweighted products, then you need to enter each case's detailed information as it comes off of the production line. Whistle uses the Report Production - Catchweight screen to facilitate this process. | If you are reporting catchweighted products, then you need to enter each case's detailed information as it comes off of the production line. Whistle uses the Report Production - Catchweight screen to facilitate this process. | ||
| + | |||
| + | |||
| + | [[Image:ReportCatch1.gif|Image:ReportCatch1.gif]] | ||
The user will be taken to the Catchweight field. The case weight needs to be entered, either manually, or a case label can be scanned into this field. | The user will be taken to the Catchweight field. The case weight needs to be entered, either manually, or a case label can be scanned into this field. | ||
Revision as of 19:15, 26 April 2006
This function is used to record all new items being produced.
This window is also one of a handful of windows in Whistle that are "tabbed" windows, indicated by the presence of numbers or letters in "tabs" on the upper right-hand corner of the window. A user is able to report production from different production lines on different tabbed windows by toggling between them using the F1, F2, F3, etc. keys. For example, a user may press F1 to access the report production screen for the peanut butter coming off of line #1, then press F2 to access the report production screen for the pasta sauce coming off of line 2, etc.
The # reported field at the bottom of the window displays the number of containers already reported vs. the number that are required to be reported (i.e. "3 of 46 expected" would mean that you have reported 3 containers and have (46-3=) 43 containers left to report.
To Report Production
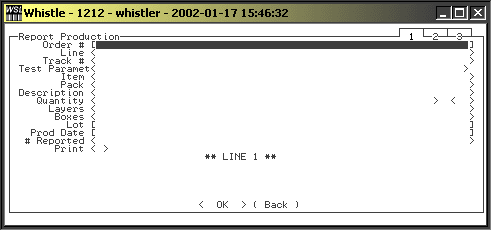
Select Report Prod from the Production menu.
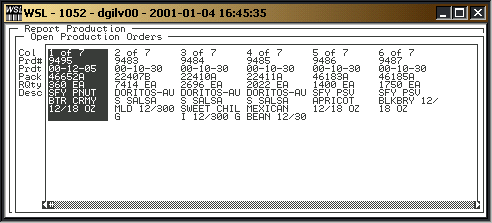
Enter the order number for the item being produced. You can view a list of ERP system pack orders by pressing the 'Control' and 'A' keys together or sequentially (handheld unit).
Select the order from the display by either pressing the line number or highlighting the line and pressing <Enter>.
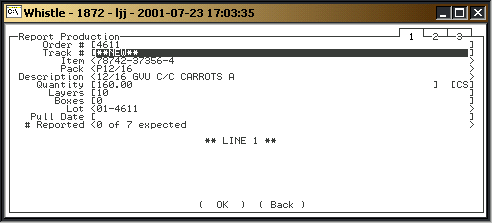
Whistle will automatically load all order information into the appropriate fields on the screen. A full container quantity for the item will be displayed. It will also display a line showing the number of containers expected to be reported, and how many have already been reported.
- NOTE
- If you are reporting production of catchweighted items, you need to highlight <Ok> and press "Enter" now. You will be taken to the Report Production - Catchweight screen. See the next section for details.
Scroll down to the 'Track #' field. A new tracking number is normally generated by Whistle. The only time you need to enter this field manually is when 1) the label printer is not working or the system is down, or 2) You would like to add items to an existing container. If (1) occurs, use a preprinted bar code label and enter (or scan) the number from the label. [Note: Whistle will accept any character string as a valid tracking number as long as it was not previously used.] Whistle will simply display '**NEW**' if a new tracking number is to be generated. The actual tracking number will be displayed when you are finished reporting the container.
Enter the Quantity that you are reporting. Simply scroll through this field if you are in agreement with the default quantity displayed.
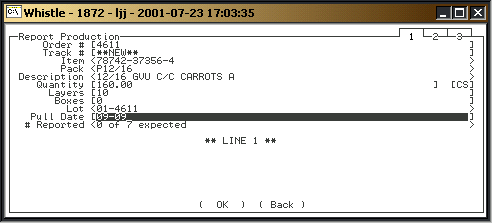
Enter the Lot and Pull Date. The shift supervisor may print a bar-coded sheet to allow the fork truck operator to scan lot numbers and pull dates. Use the bar code scanner to enter information quickly and accurately. There are two acceptable Pull Date formats: YYYY-MM-DD and MM-DD. Note: When in MM-DD format, Whistle will automatically use the current year if the current date is prior to the pull date, otherwise, Whistle will default to the next year.
Once all of the information has been entered, highlight <OK> and press the <Enter> key.
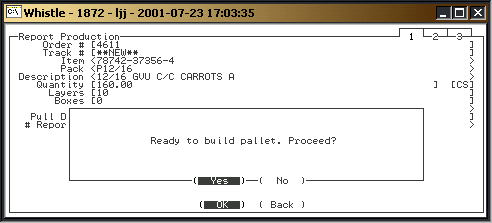
You may get a verification dialog, asking if you want to proceed. This is your last chance to verify that the information entered on the screen is correct. Press <Yes> to continue, or highlight <No> and press <Enter> to return to setting to the previous screen to make any necessary corrections.
Containers may be put away as soon as they come off of the production line. Whistle will ask if you would like to put away containers every time you report a production. Notice that at this point, Whistle will display the tracking # of the container that was just produced. If <Yes> is selected, Whistle will take the user to the Putaway screen. Refer to that section of this guide for more information concerning Putaway. If <No> is selected, you remain in the Report Production window to report production of another container.
A “Print” checkbox and “Copies” field are available so the user may specify whether new print tags are required and how many copies are preferred.
To Report Catchweighted Production
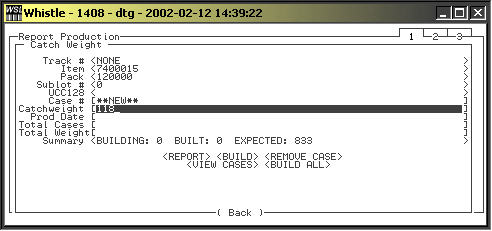
If you are reporting catchweighted products, then you need to enter each case's detailed information as it comes off of the production line. Whistle uses the Report Production - Catchweight screen to facilitate this process.
The user will be taken to the Catchweight field. The case weight needs to be entered, either manually, or a case label can be scanned into this field.
A “Print” checkbox and “Copies” field are available so the user may specify whether new print tags are required and how many copies are preferred.
A “Print Cs” checkbox and “Copies” field are available so the user may specify whether new print tags are required for the case, and how many copies are preferred. There is a "Printer" field, so that you can specify a different printer to use to print the case labels.
Select <ADD CASE> to create the container and the case.
Select <REPORT PALLET> to report the pallet production.
Select <VIEW CASES> to view the cases you have previously reported.
Select <CHANGE CS PRINTER> to choose a different printer to print the case labels on.
